Command Palette
Search for a command to run...
Online Tutorial | Deploy OpenClaw Using Free CPU and Easily Integrate With Social Software Such As Lark/Discord
During NVIDIA GTC 2026, Jensen Huang's high praise for OpenClaw further fueled its popularity.OpenClaw is now the largest, most popular, and most successful open-source project in human history, and it is definitely the next ChatGPT.He believes that every company needs to develop its own OpenClaw strategy, and its future importance will be comparable to that of basic software infrastructures such as Linux, Kubernetes, and HTML.
It can be said that OpenClaw is no longer satisfied with having large models "generate content", but is trying to make models truly participate in execution, from calling APIs to connecting workflows, transforming "AI capabilities" into "practical actions".
Over the past period of time, more and more developers have started to try deploying OpenClaw, but the other side of the hype is also very real: complex environment configuration, cumbersome dependencies, limited runtime resources, unclear skills call chain... These problems have caused many people to stop at "running the demo".However, it's worth noting that the key to OpenClaw's value lies in the integration of skills with real-world business scenarios. For example, in team collaboration scenarios:
* By integrating with Lark Skills, automatic message processing, task synchronization, and robot response can be achieved.
* Build AI bots with context understanding and automated execution capabilities within the Discord community.
* Connect API calls, notifications, and data processing into a complete automated chain.
To facilitate developers' experience with OpenClaw's capabilities in real-world application scenarios,HyperAI has released "🦞 OpenClaw: Running it using the API via Free-CPU" and "🦞 OpenClaw GPU Running Tutorial".Integrate OpenClaw into various social applications to achieve a wide range of automated tasks. Includes:
* Lark integration: Covers self-built application creation, event subscription configuration, and streaming responses.
* Discord integration: Includes Bot permission settings, Slash Command definition, and message processing via Long Polling or WebSockets.
Meanwhile, HyperAI also launched an online tutorial on "Implementing a Scheduled Task for Automatic Information Fetching Based on OpenClaw", which completed the environment configuration and lowered the threshold for skill deployment.
🦞 OpenClaw: Running API calls using Free-CPU
🦞 OpenClaw GPU Running Tutorial
Implementing scheduled tasks for automatic information retrieval based on OpenClaw
HyperAI provides free CPU quotas to developers worldwide.Basic users can run a single task for up to 12 hours continuously, while Pro users can run a single task for up to 24 hours continuously.
Click to learn more about HyperAI Pro:Free CPU usage / 30 hours of GPU usage credit / 70GB of super-large storage, HyperAI Pro is officially launched!
This tutorial uses "🦞 OpenClaw: Running API Calls Using Free-CPU" as an example.This document details how to deploy OpenClaw on the HyperAI platform and integrate it with Discord.

Demo Run
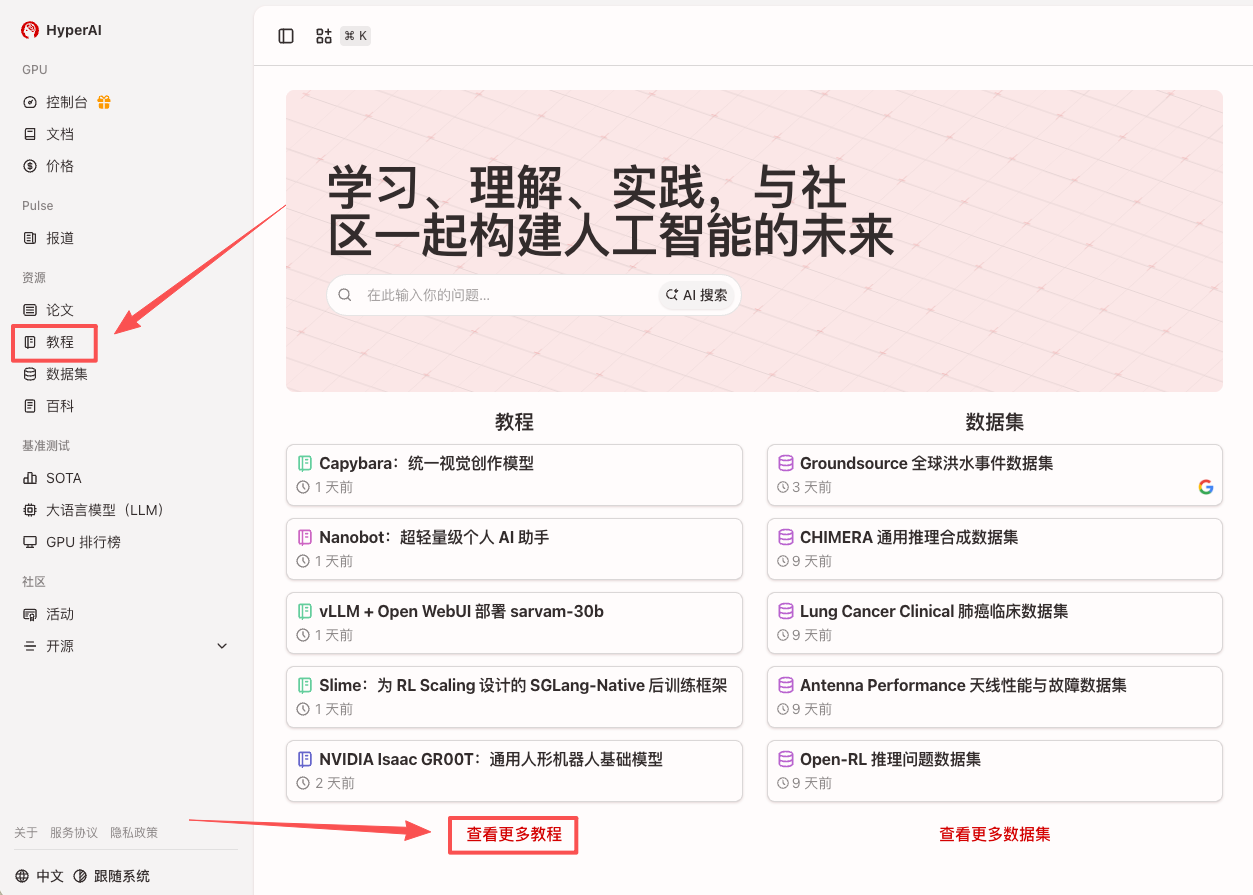
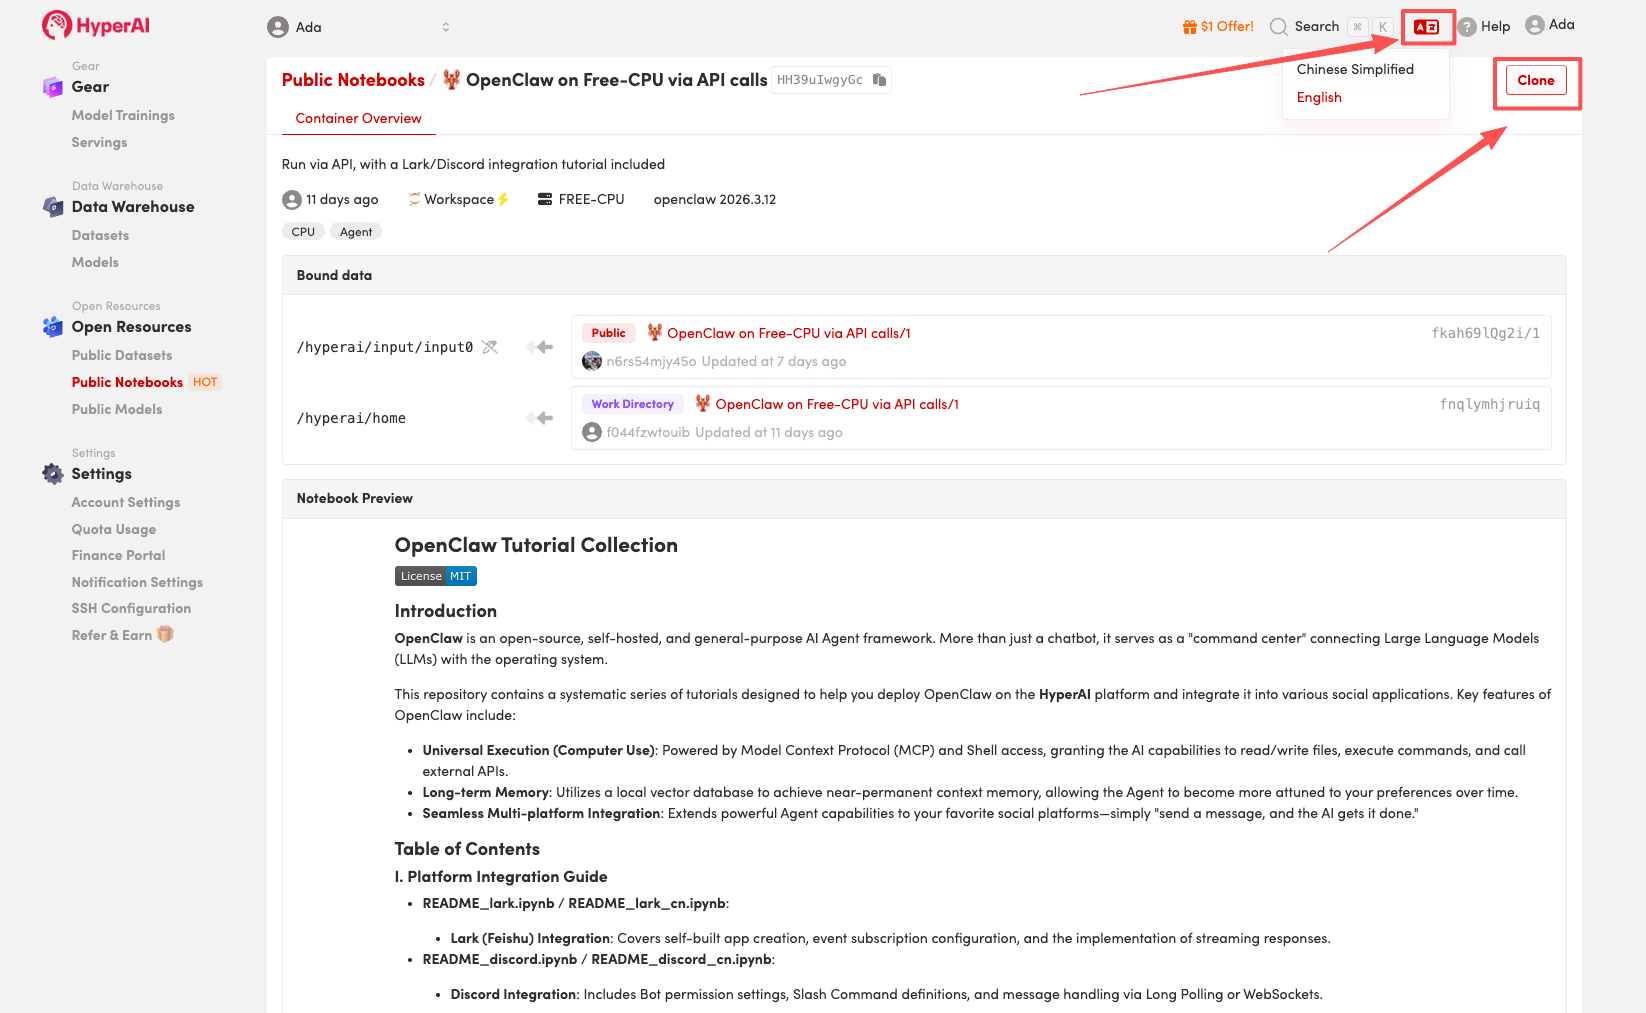
1. After entering the hyper.ai homepage, select the "Tutorials" page, or click "View More Tutorials", select "🦞 OpenClaw: Running with Free-CPU API", and click "Run this tutorial online".
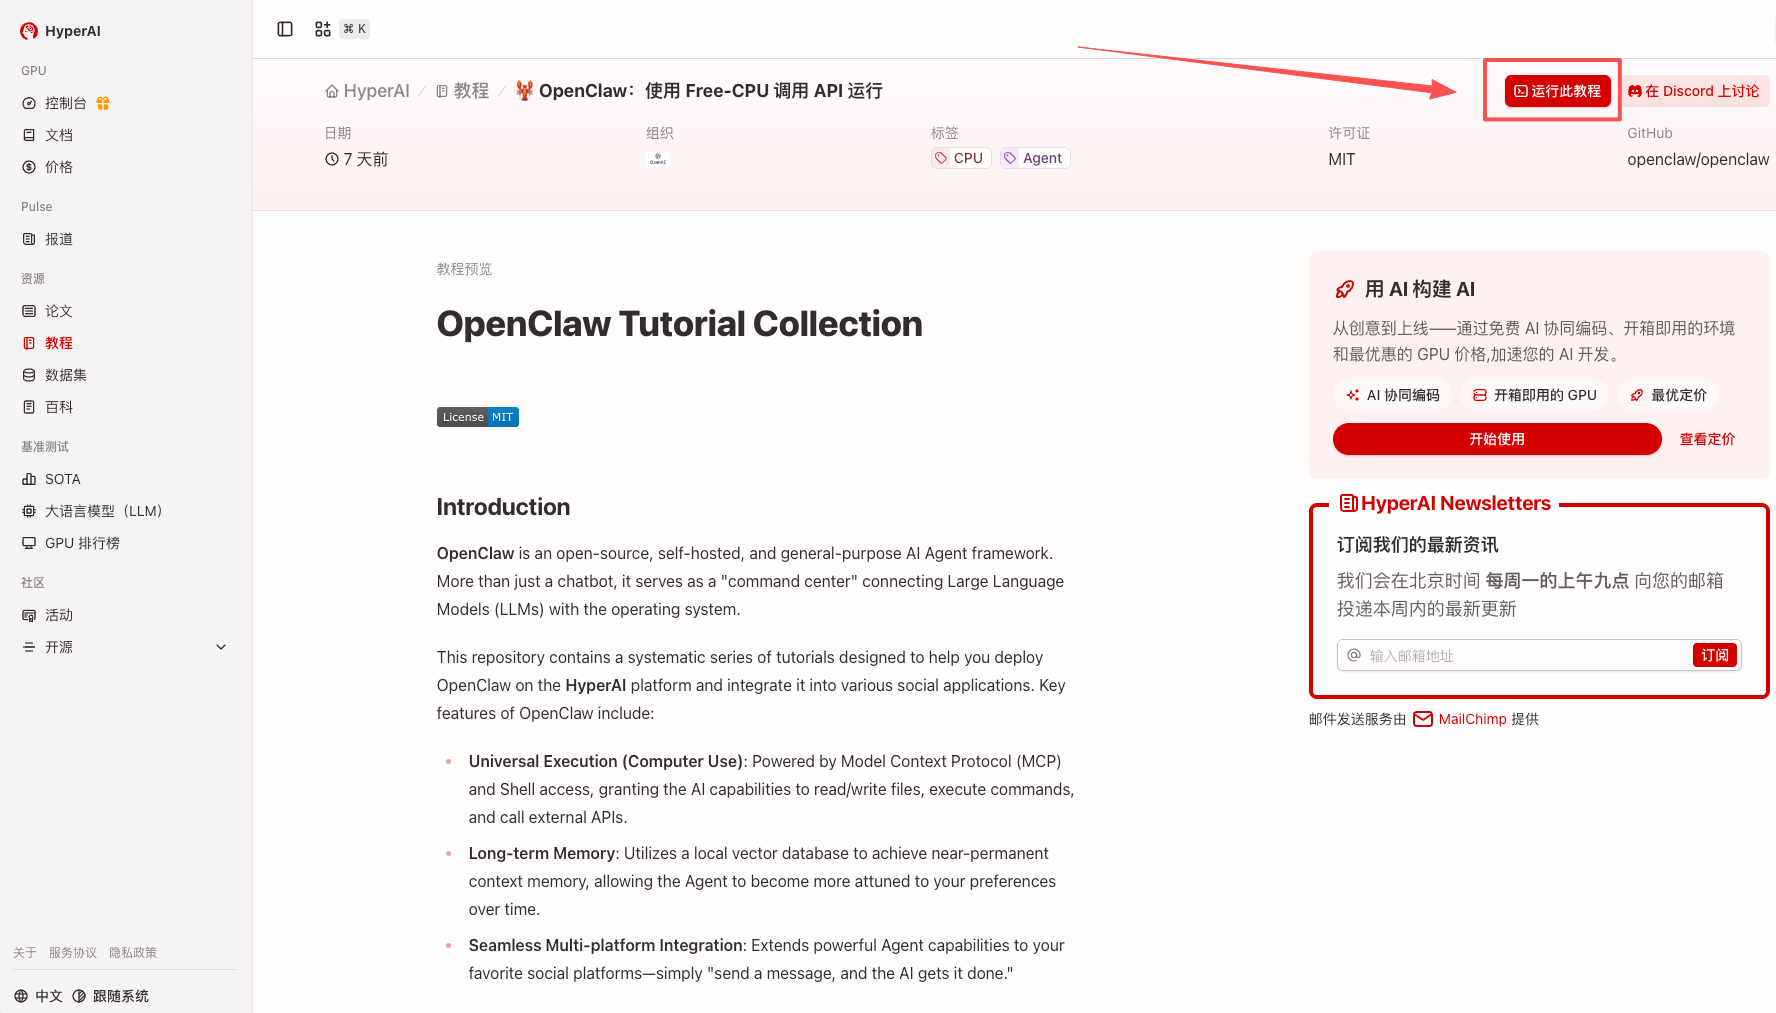
2. After the page redirects, click "Clone" in the upper right corner to clone the tutorial into your own container.
Note: You can switch languages in the upper right corner of the page. Currently, Chinese and English are available. This tutorial will show the steps in English.
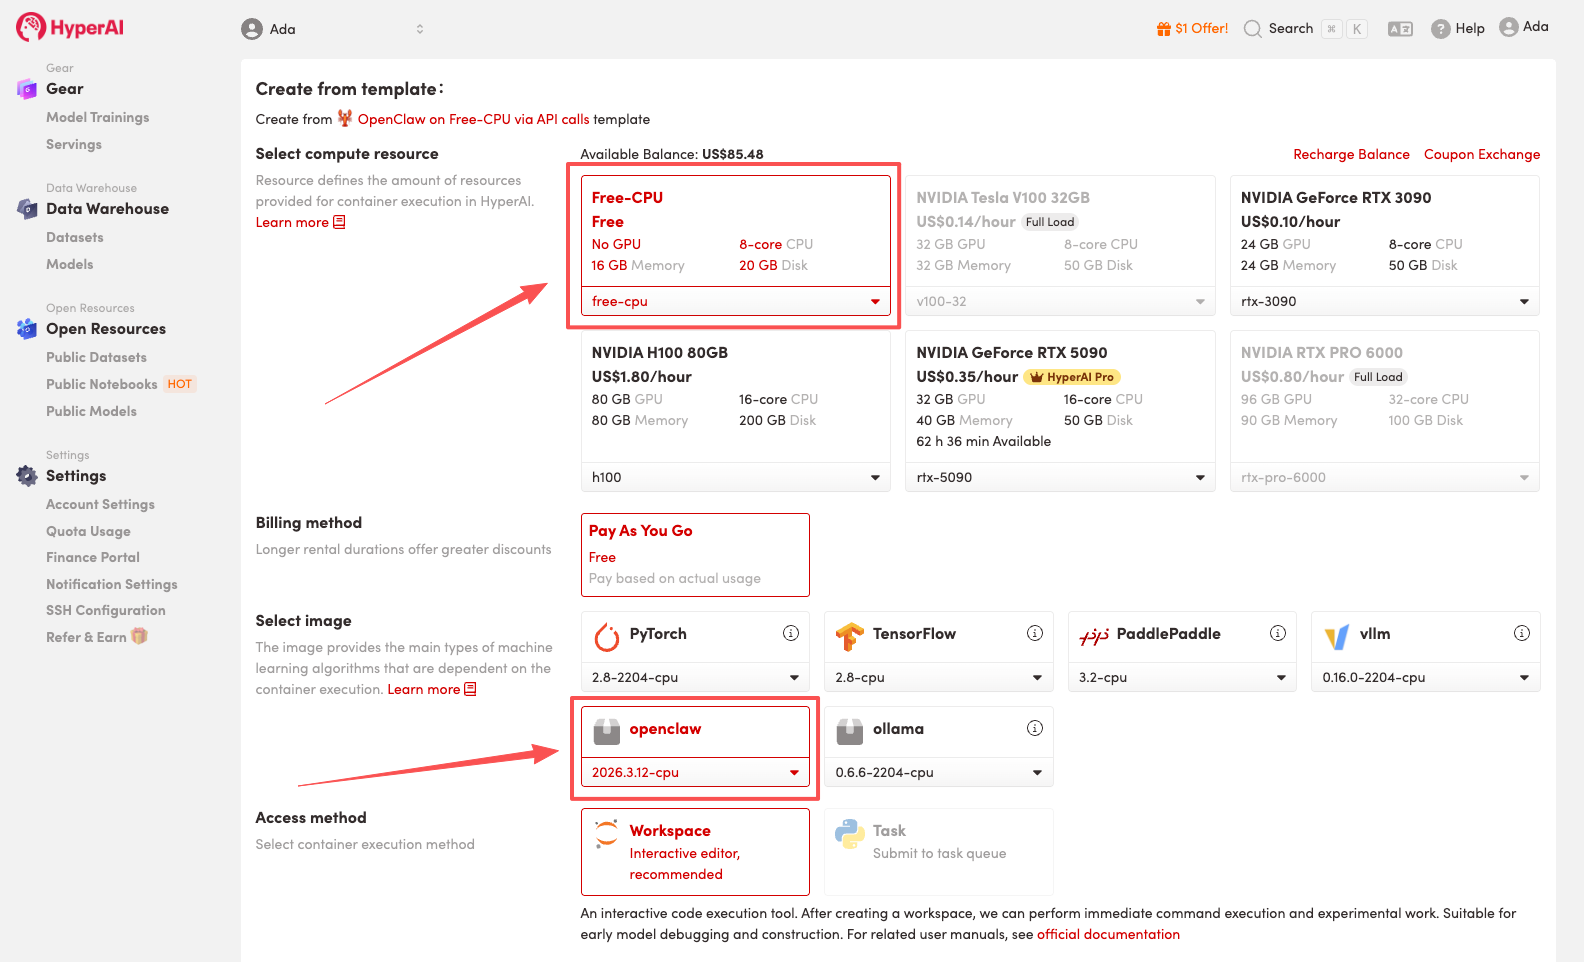
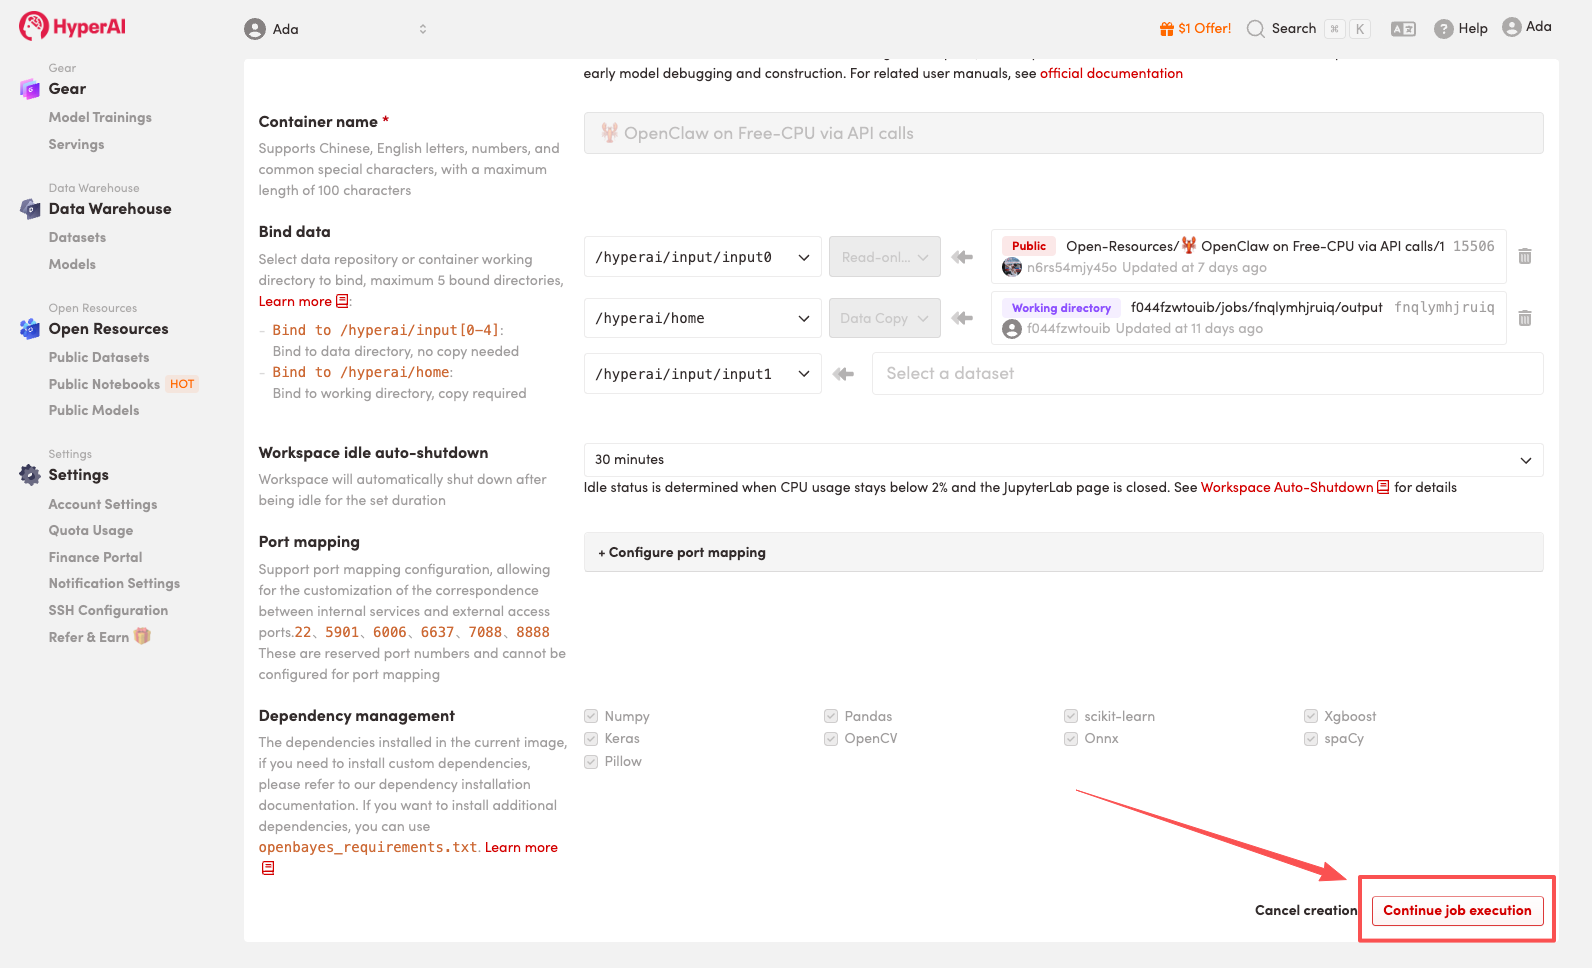
3. Select the "Free-CPU" and "openclaw" images, and click "Continue job execution".
HyperAI is offering a registration bonus for new users: for just $1, you can get 20 hours of RTX 5090 computing power (originally priced at $7), and the resources are valid indefinitely.
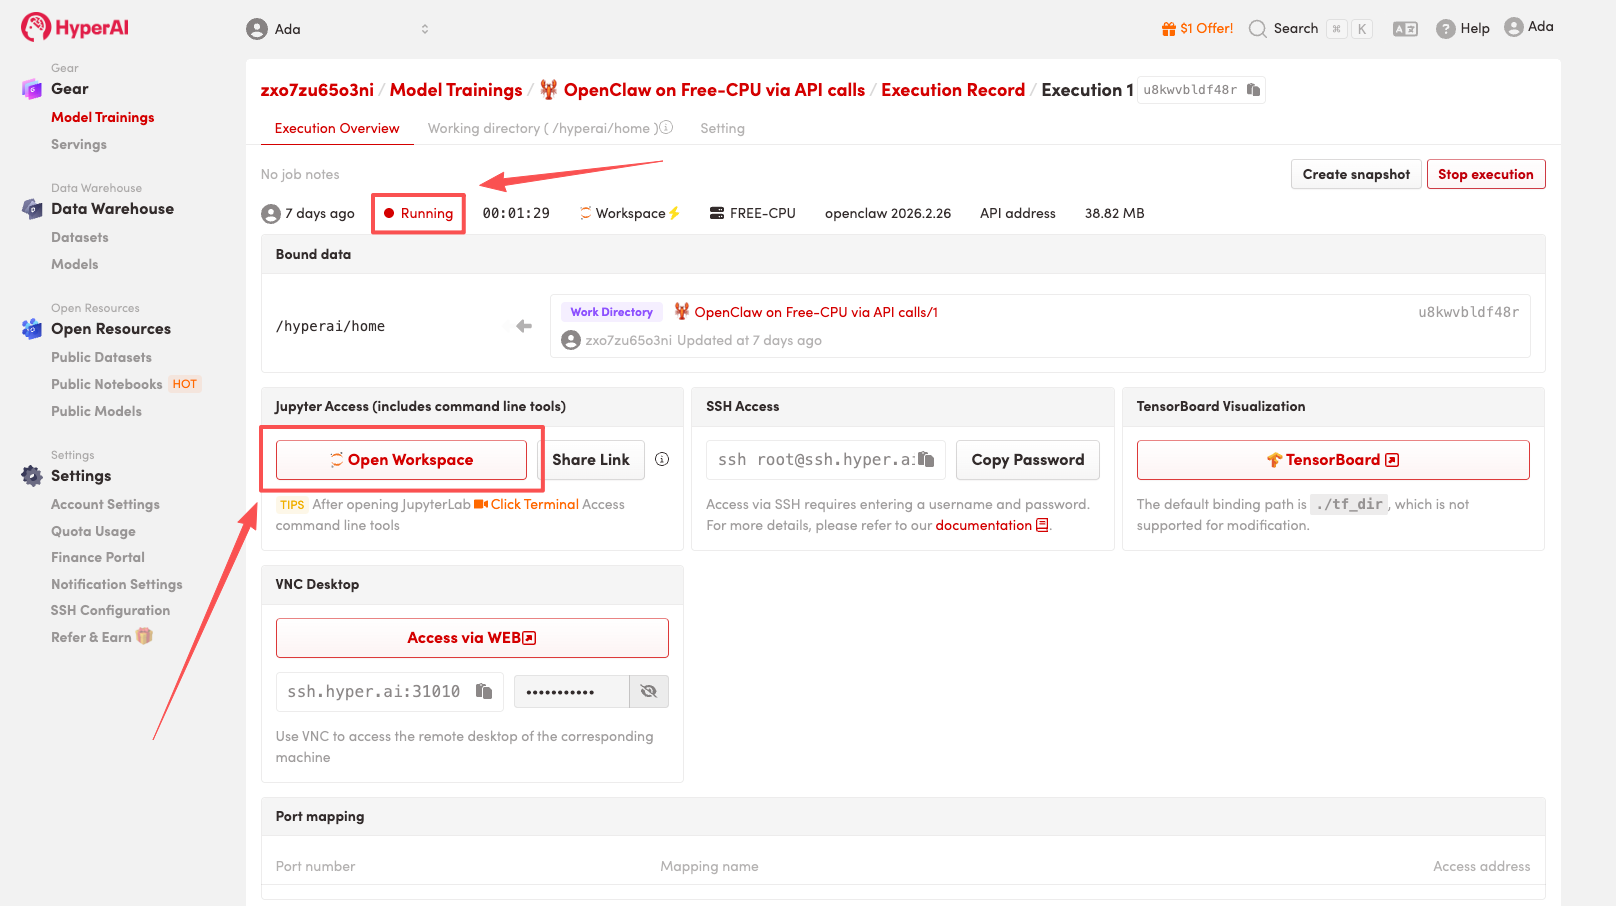
4. Wait for resources to be allocated. Once the status changes to "Running", click "Open Workspace" to enter the Jupyter Workspace.
Effect display
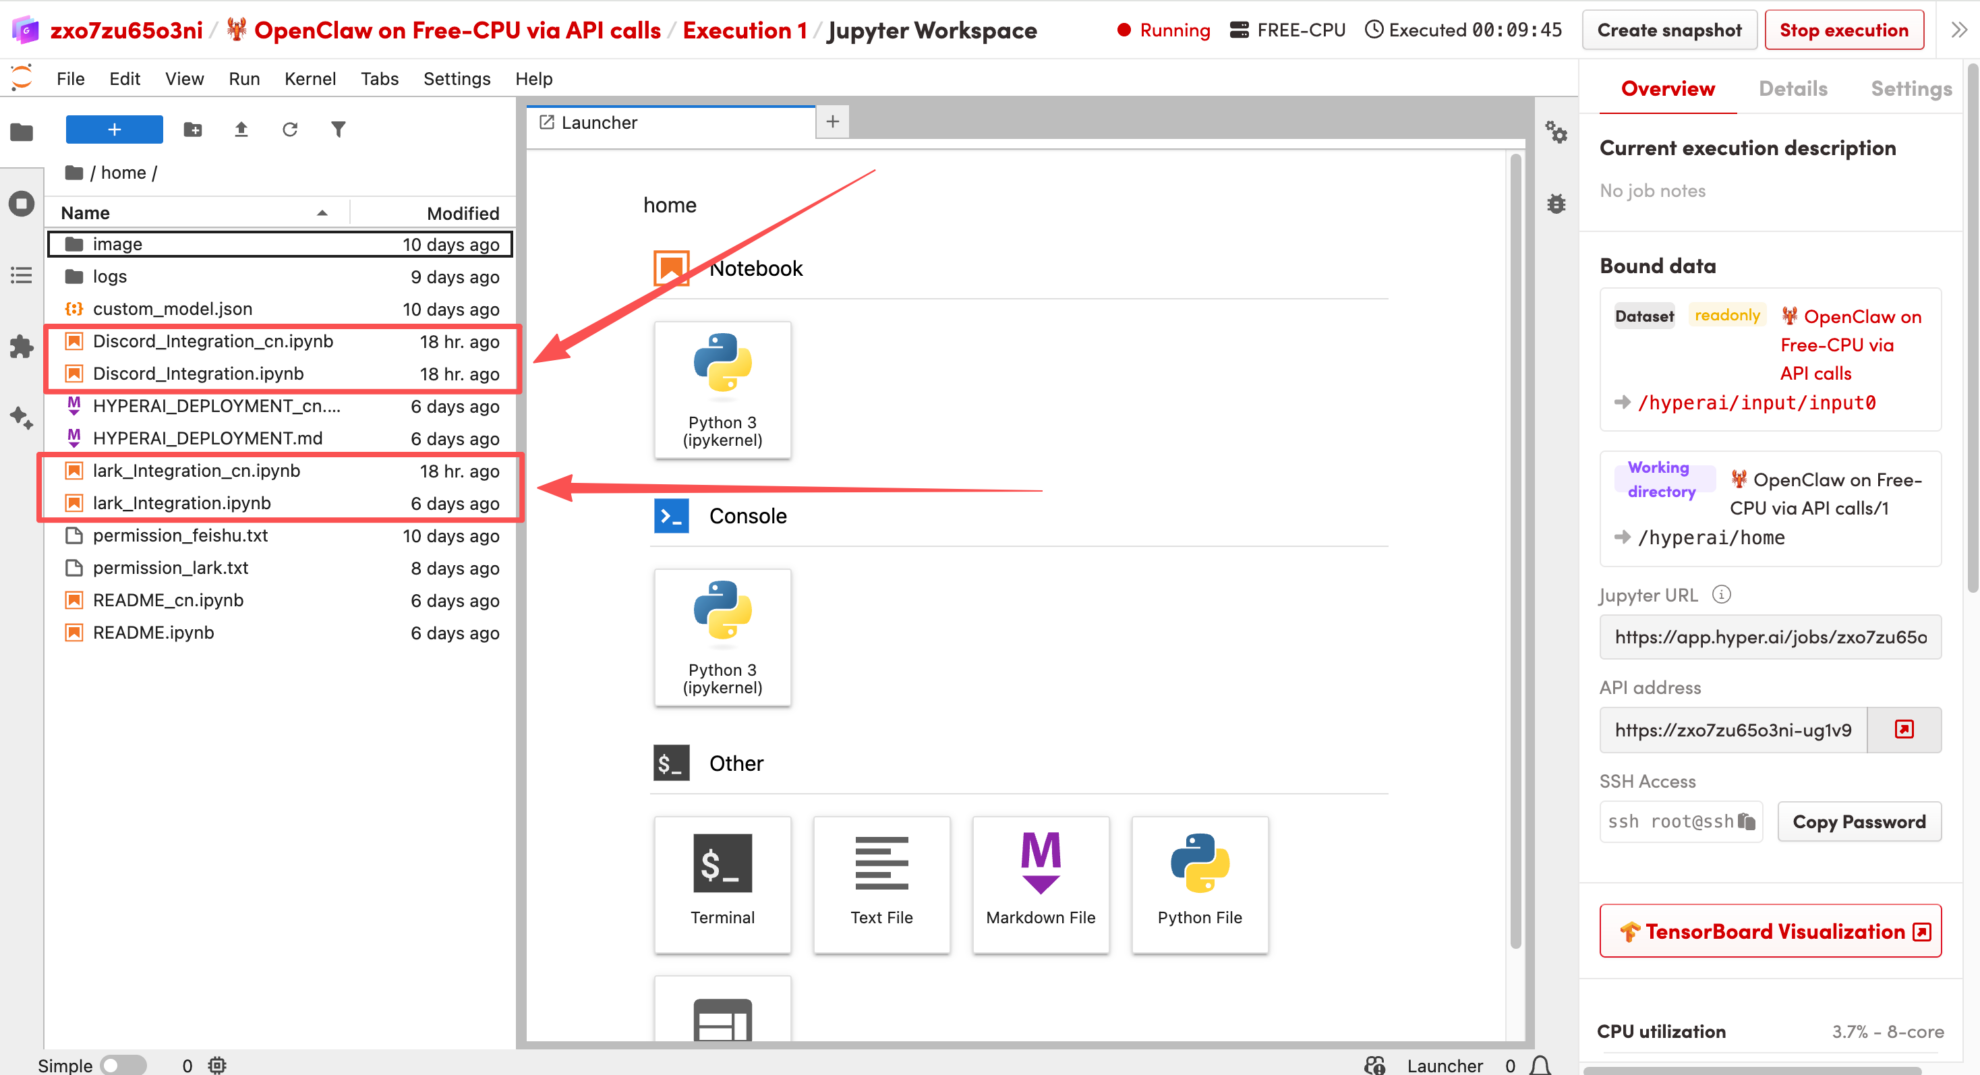
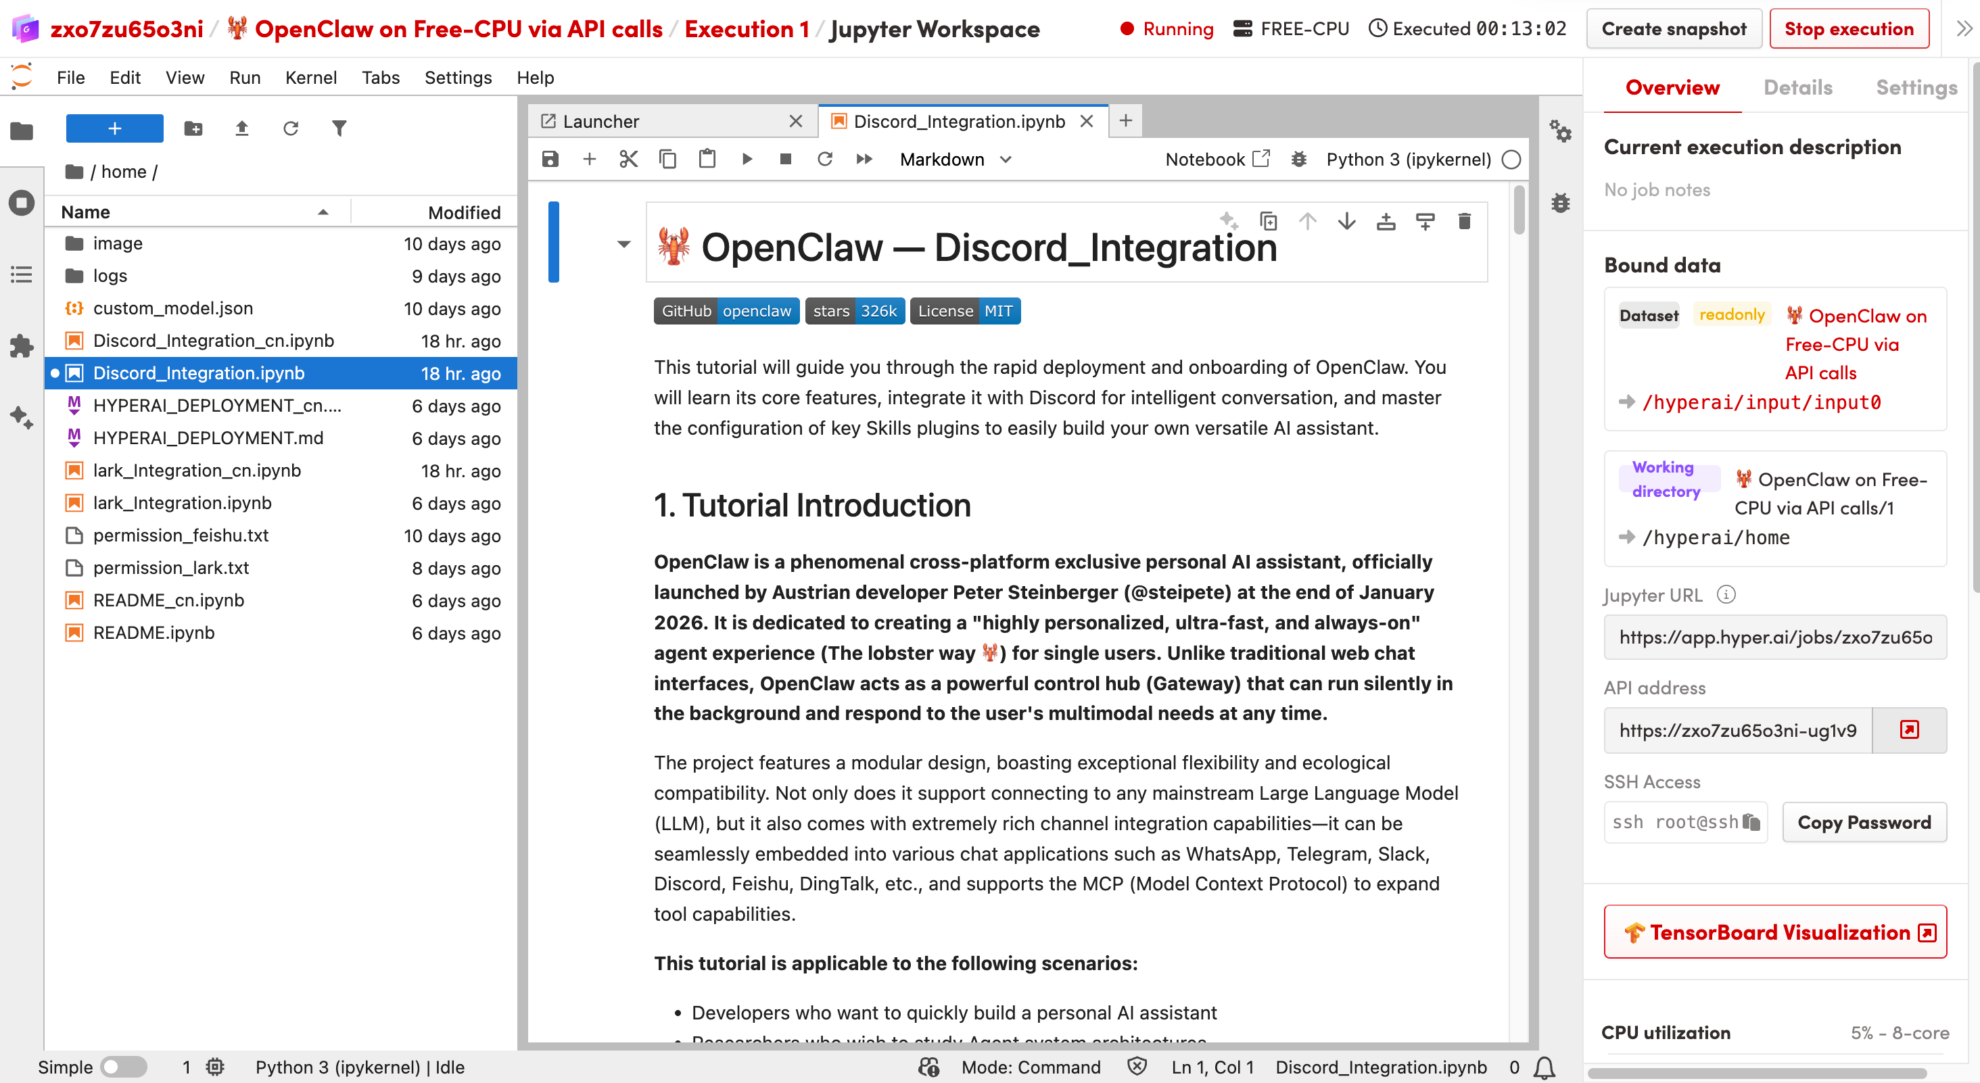
1. After the page redirects, select the corresponding README file according to the application you need to access, and double-click to enter the page. Here, Discord is used as an example.
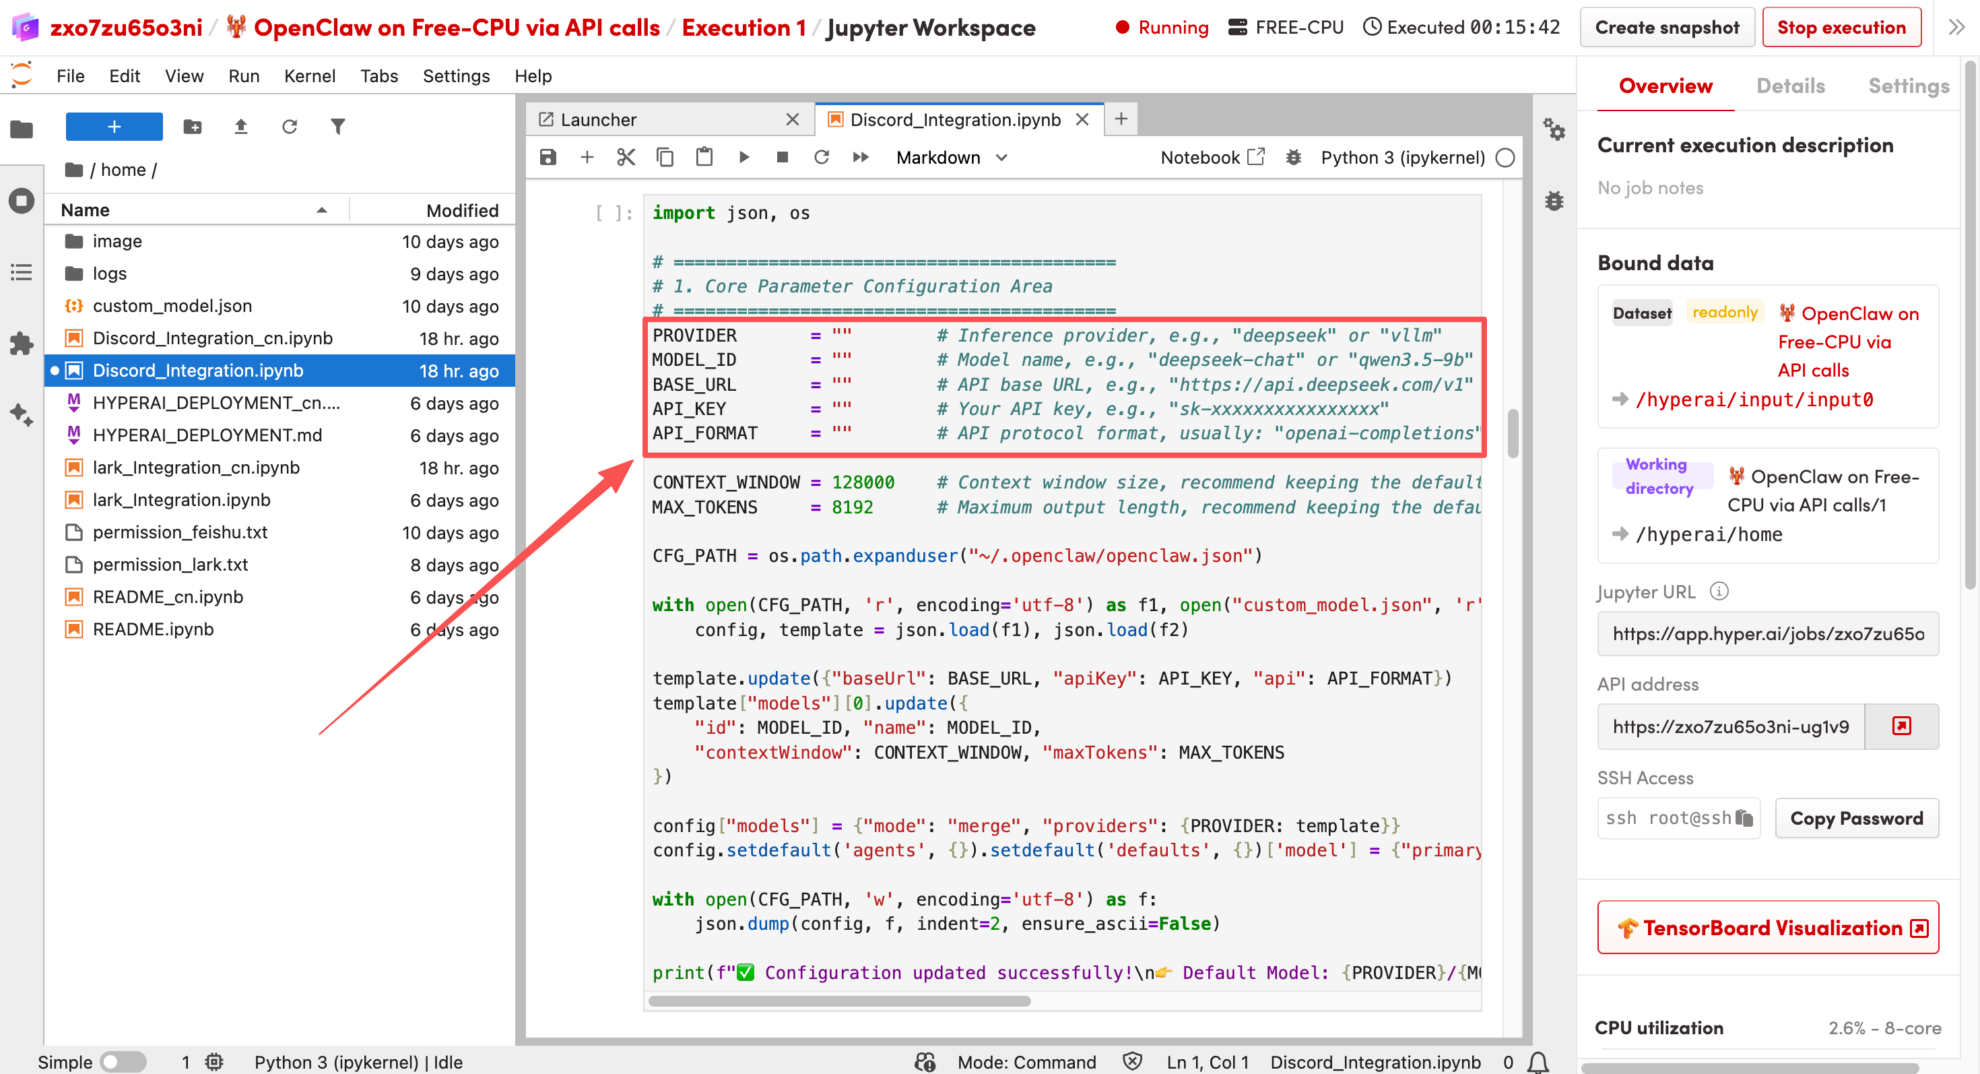
2. Next, specify the model API to be called: Enter the API information in the parameters of the code block below and execute the code. The script will automatically complete the merging and writing with the openclaw.json configuration file.
3. After the model has started, you can run the following code to start openclaw. The relevant logs are saved in the openclaw_gateway.log file.
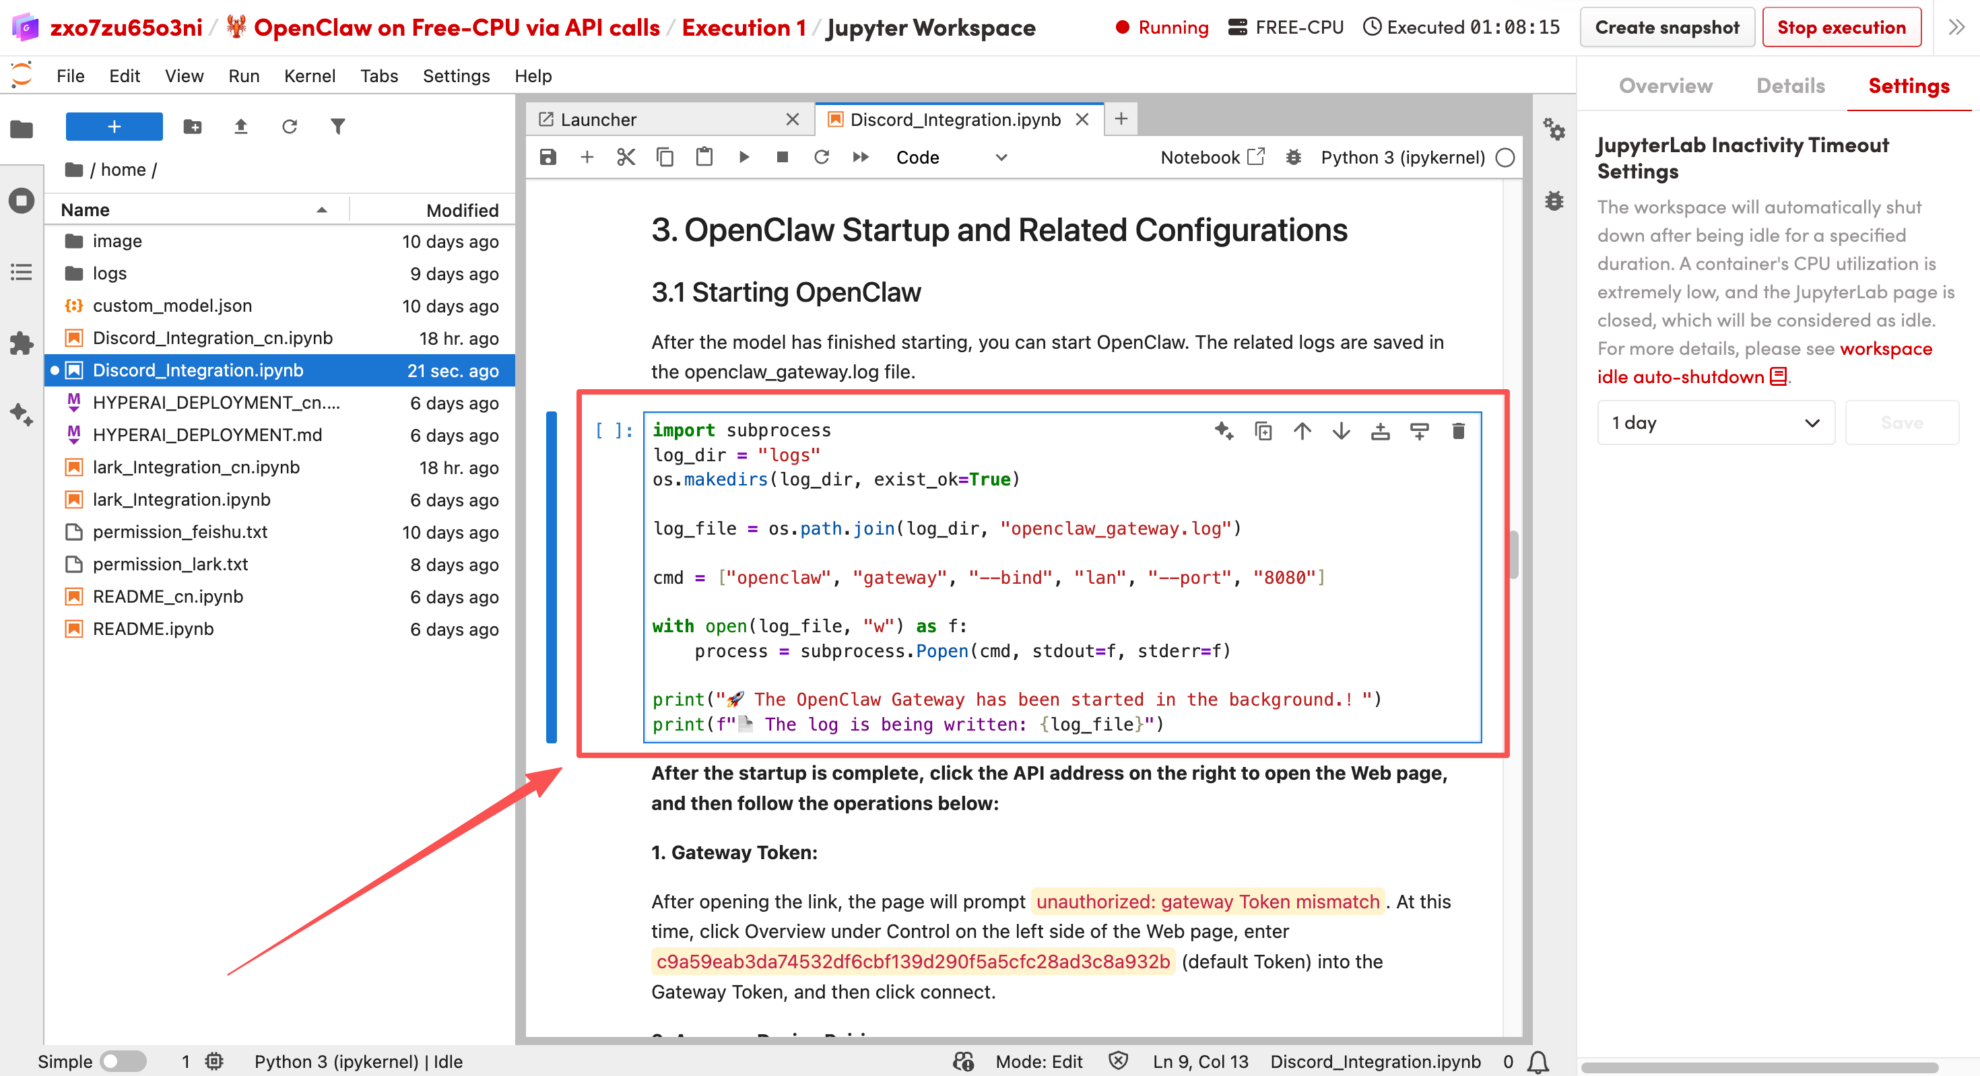
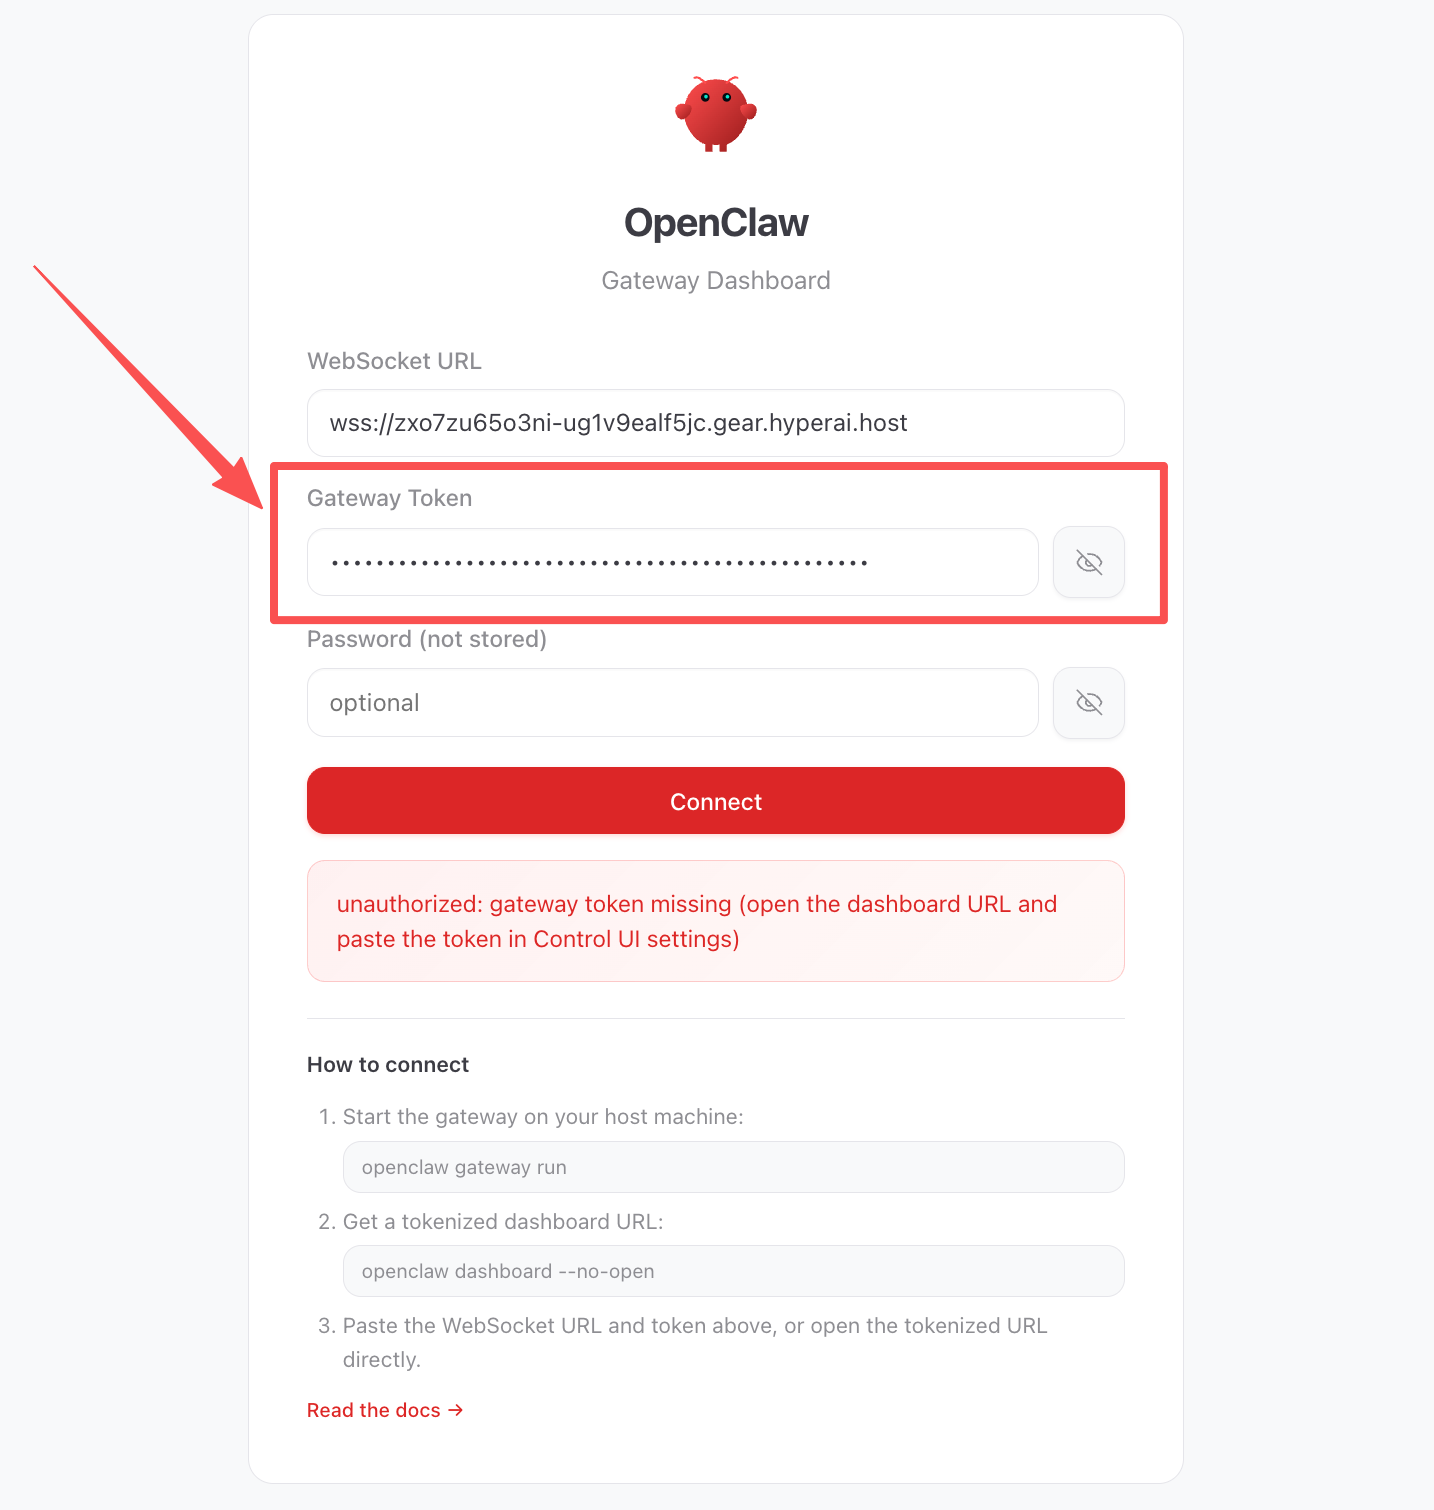
4. After startup is complete, click the API address on the right to open the web page. After opening the link, the page will display the message "unauthorized: gateway token mismatch".
At this point, click Overview under Control on the left side of the Web page, enter c9a59eab3da74532df6cbf139d290f5a5cfc28ad3c8a932b (default Token) into Gateway Token, and then click connect.
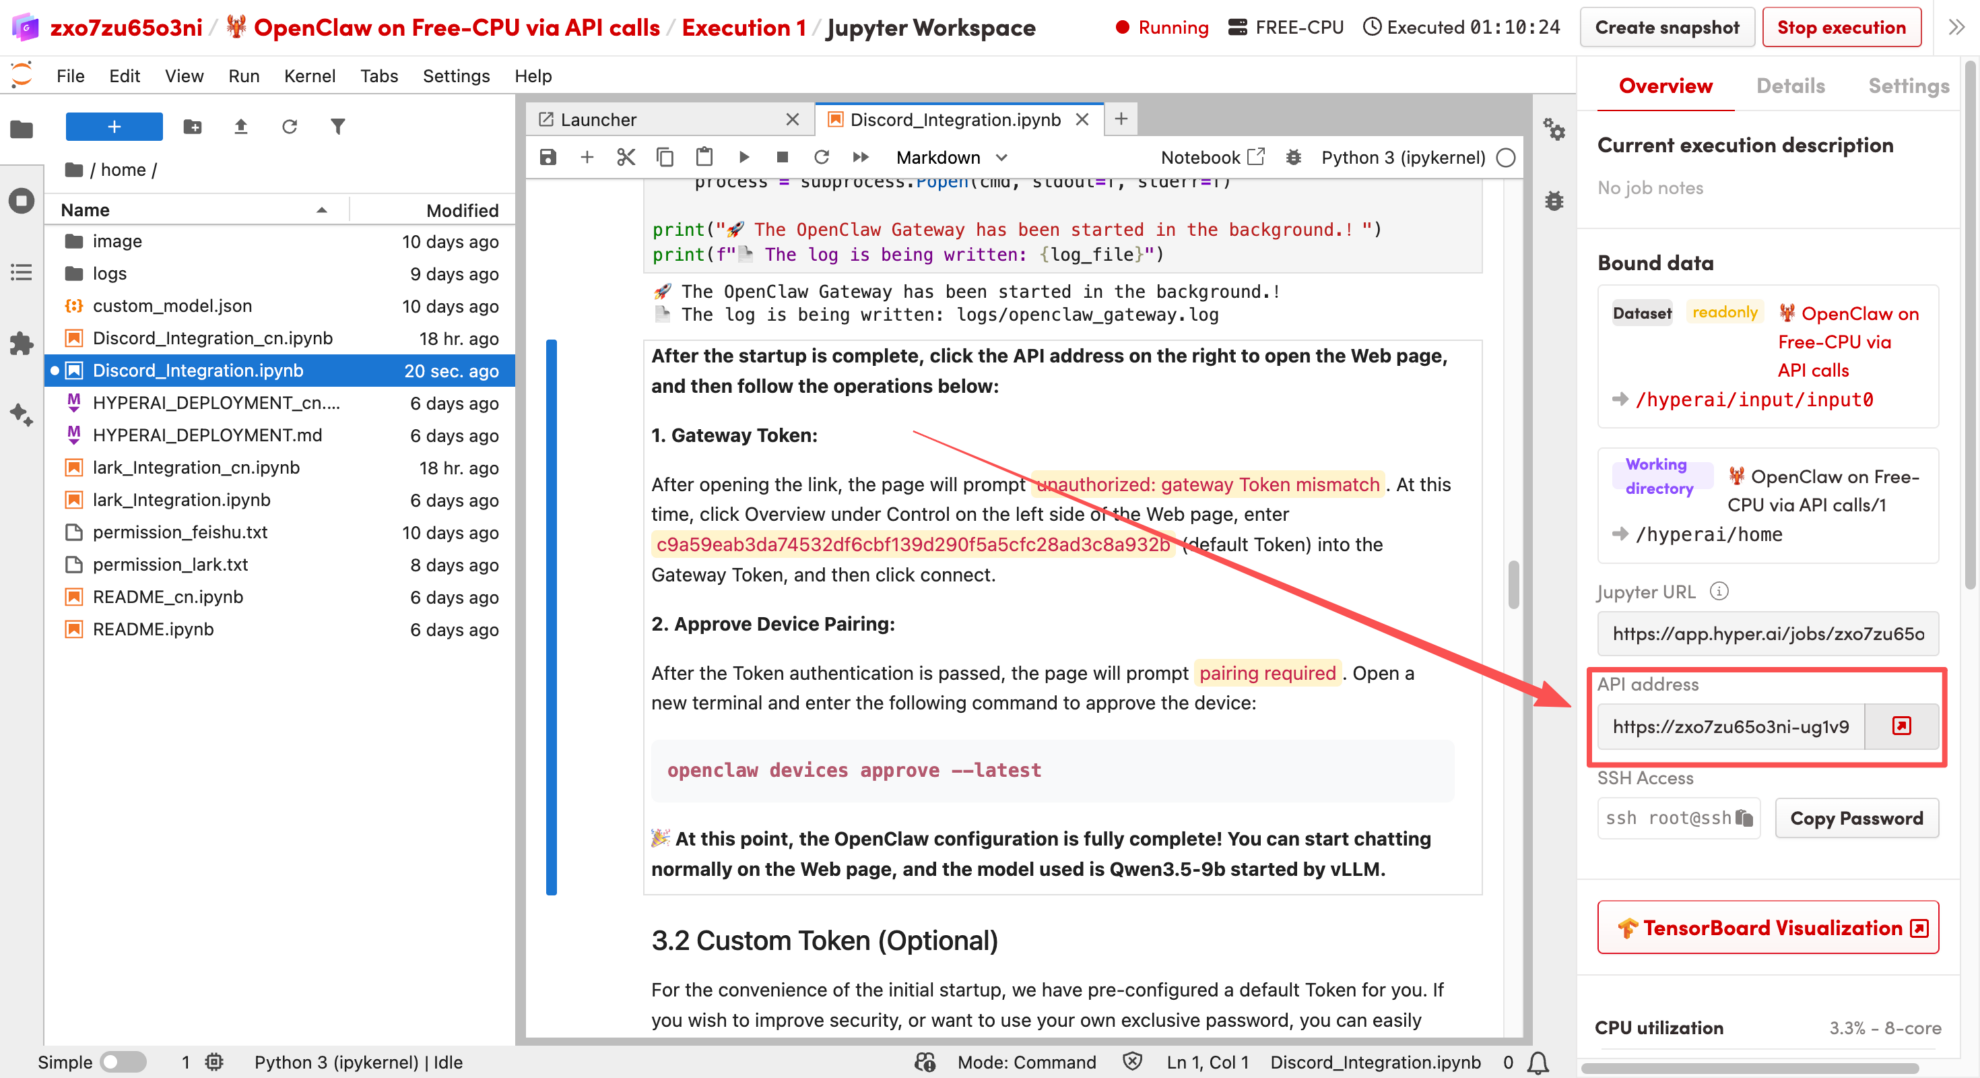
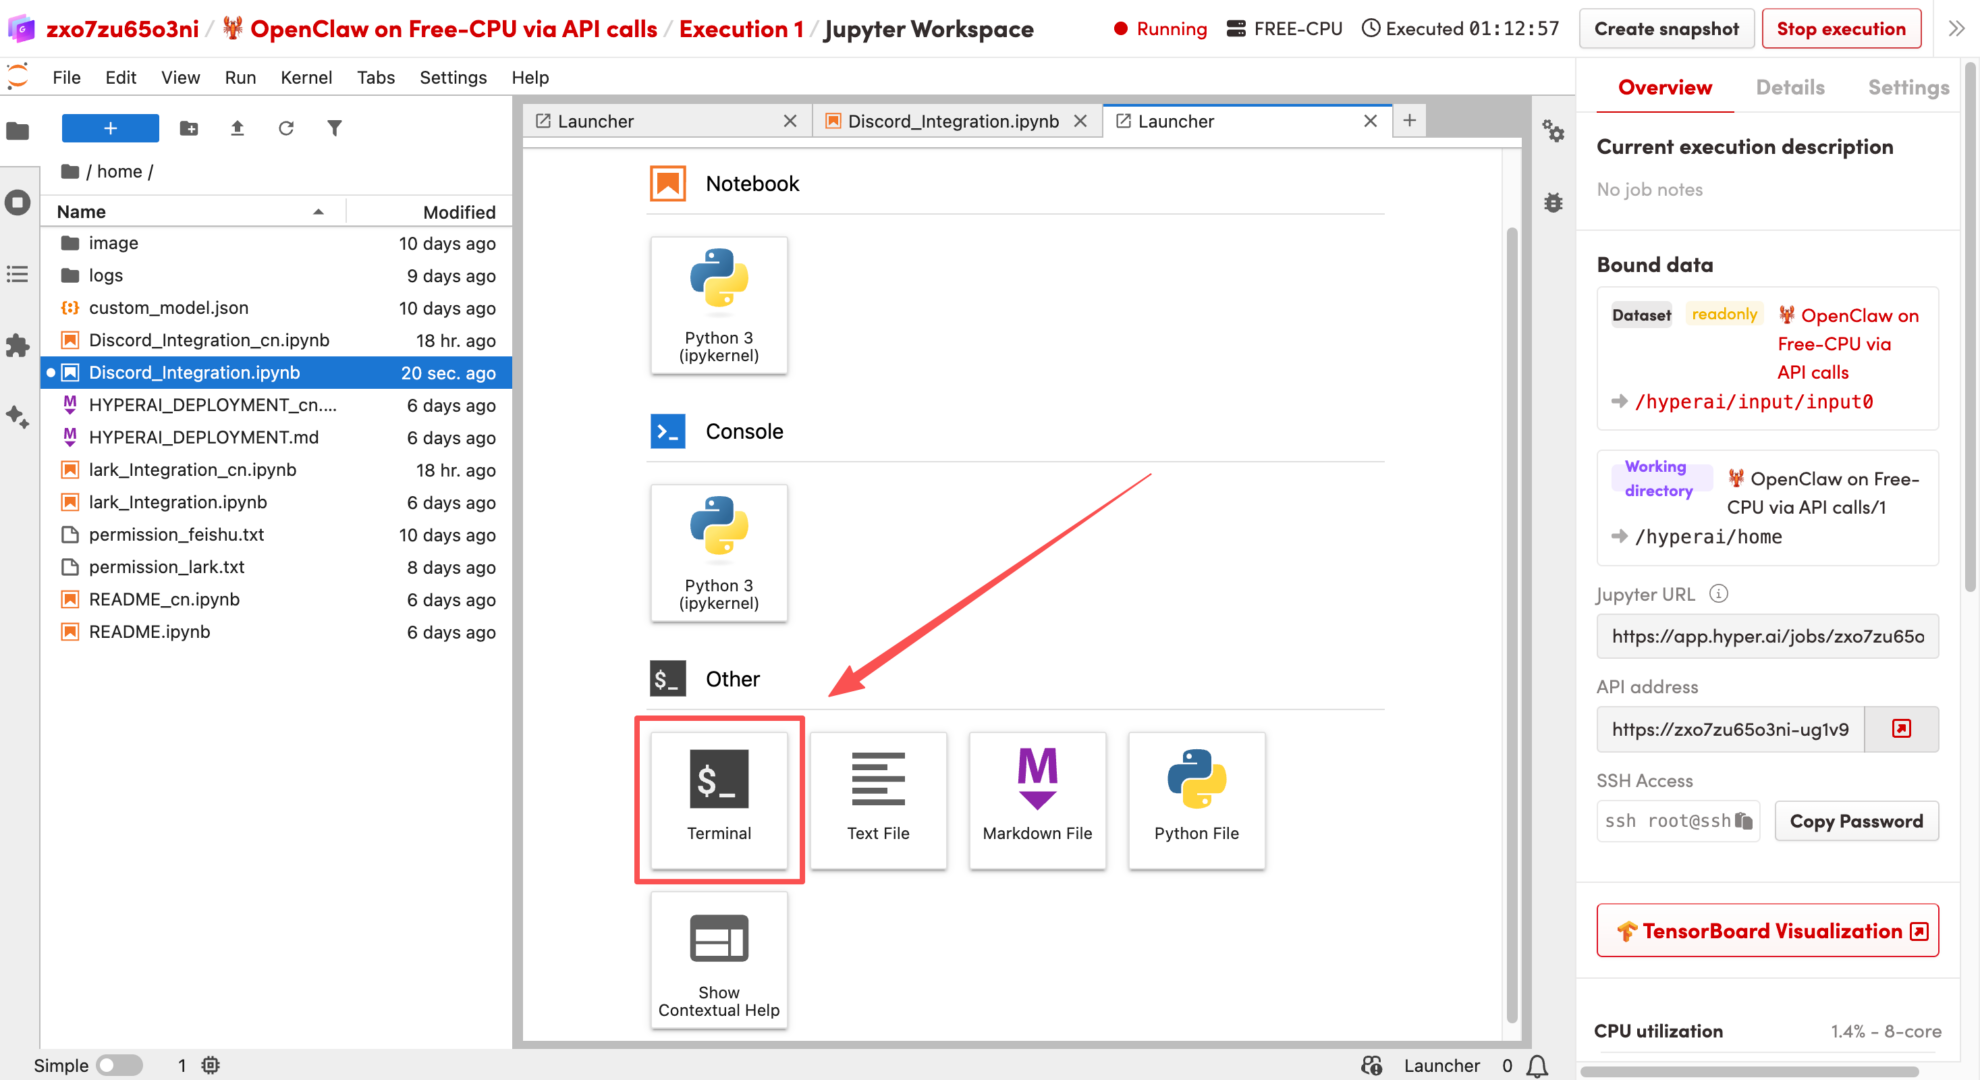
5. After successful token authentication, the page will display "pairing required". Then, create a new terminal and enter the following command to approve the device:
openclaw devices approve –latest
At this point,OpenClaw configuration complete! You can now start chatting normally on the web page, using the same model as the API call you previously used.
6. Next, you can prepare for the Discord developer platform. First, register a bot account in the Discord developer backend and invite it to your server. If you don't have your own dedicated server yet, create one by selecting "Create My Own" -> "for me and my friend". Then, follow these steps to complete the basic configuration:
Creating apps and robots:
Log in to the Discord Developer Portal, click "New Application" to create an application, and name it, for example, OpenClaw. Then, click "Bot" in the left navigation bar and set the Username to your OpenClaw Agent name.
Privileged Gateway Intents:
On the Bot page, scroll down to find the Privileged Gateway Intents section. Message Content Intent must be enabled; it is recommended to also enable Server Members Intent.
Generate an invitation link and add the bot to the server:
Return to the "OAuth2" page in the developer platform, scroll down to OAuth2 URL Generator and check bot and applications.commands. In the Bot Permissions list that pops up below, check View Channels, Send Messages, Read Message History, Embed Links, and Attach Files. Copy the link generated at the bottom, open it in your browser, select your server, and click "Continue" to complete the connection.
Obtain core credentials:
Return to the top of the Bot page and click "Reset Token" to generate and copy your Bot Token. This crucial credential will be used shortly in the subsequent environment configuration!
Enable developer mode and collect IDs:
Open the Discord client, go to "User Settings" -> "Advanced," and enable "Developer Mode." Then, right-click your server icon in the left sidebar and click "Copy Server ID." Next, right-click your own avatar and click "Copy User ID." Save these two IDs along with your previous Token; you may need them later.
Allow server members to initiate private chats:
For the pairing process to work correctly, Discord must allow bots to send you direct messages. Right-click your server icon, go to "Privacy Settings," and make sure "Allow Direct Messages" is enabled.
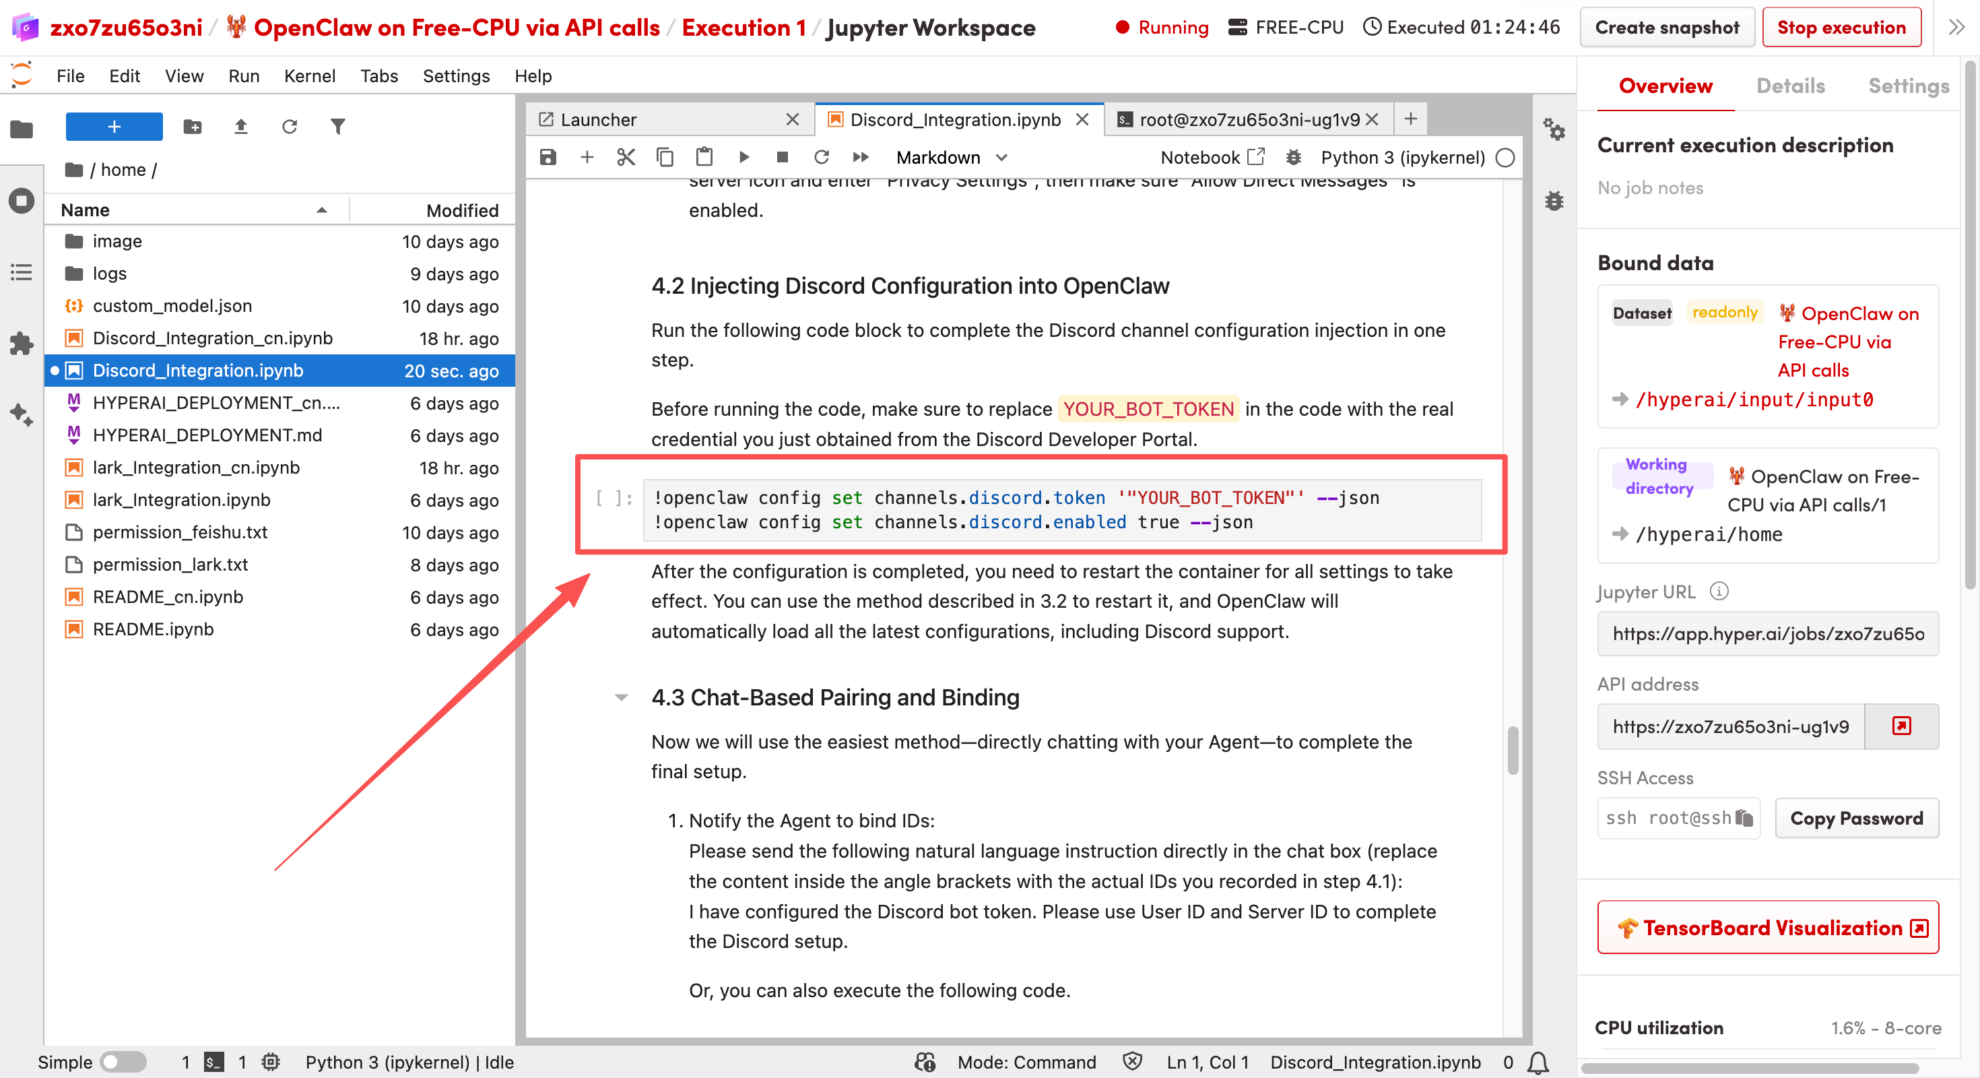
7. OpenClaw Integration with Discord Configuration: Simply run the following code block to complete the configuration injection of the Discord channel with one click.
Before running the code, please be sure to replace YOUR_BOT_TOKEN in the code with the real credentials you just obtained from the Discord Open Platform.
8. Complete the final setup by communicating with the Agent: Send the following natural language command directly to it in the chat box (replace the content within the angle brackets with your actual ID): I have configured the Discord bot token. Please use User ID <Your User_ID> and Server ID <Your Server_ID> to complete the Discord setup.
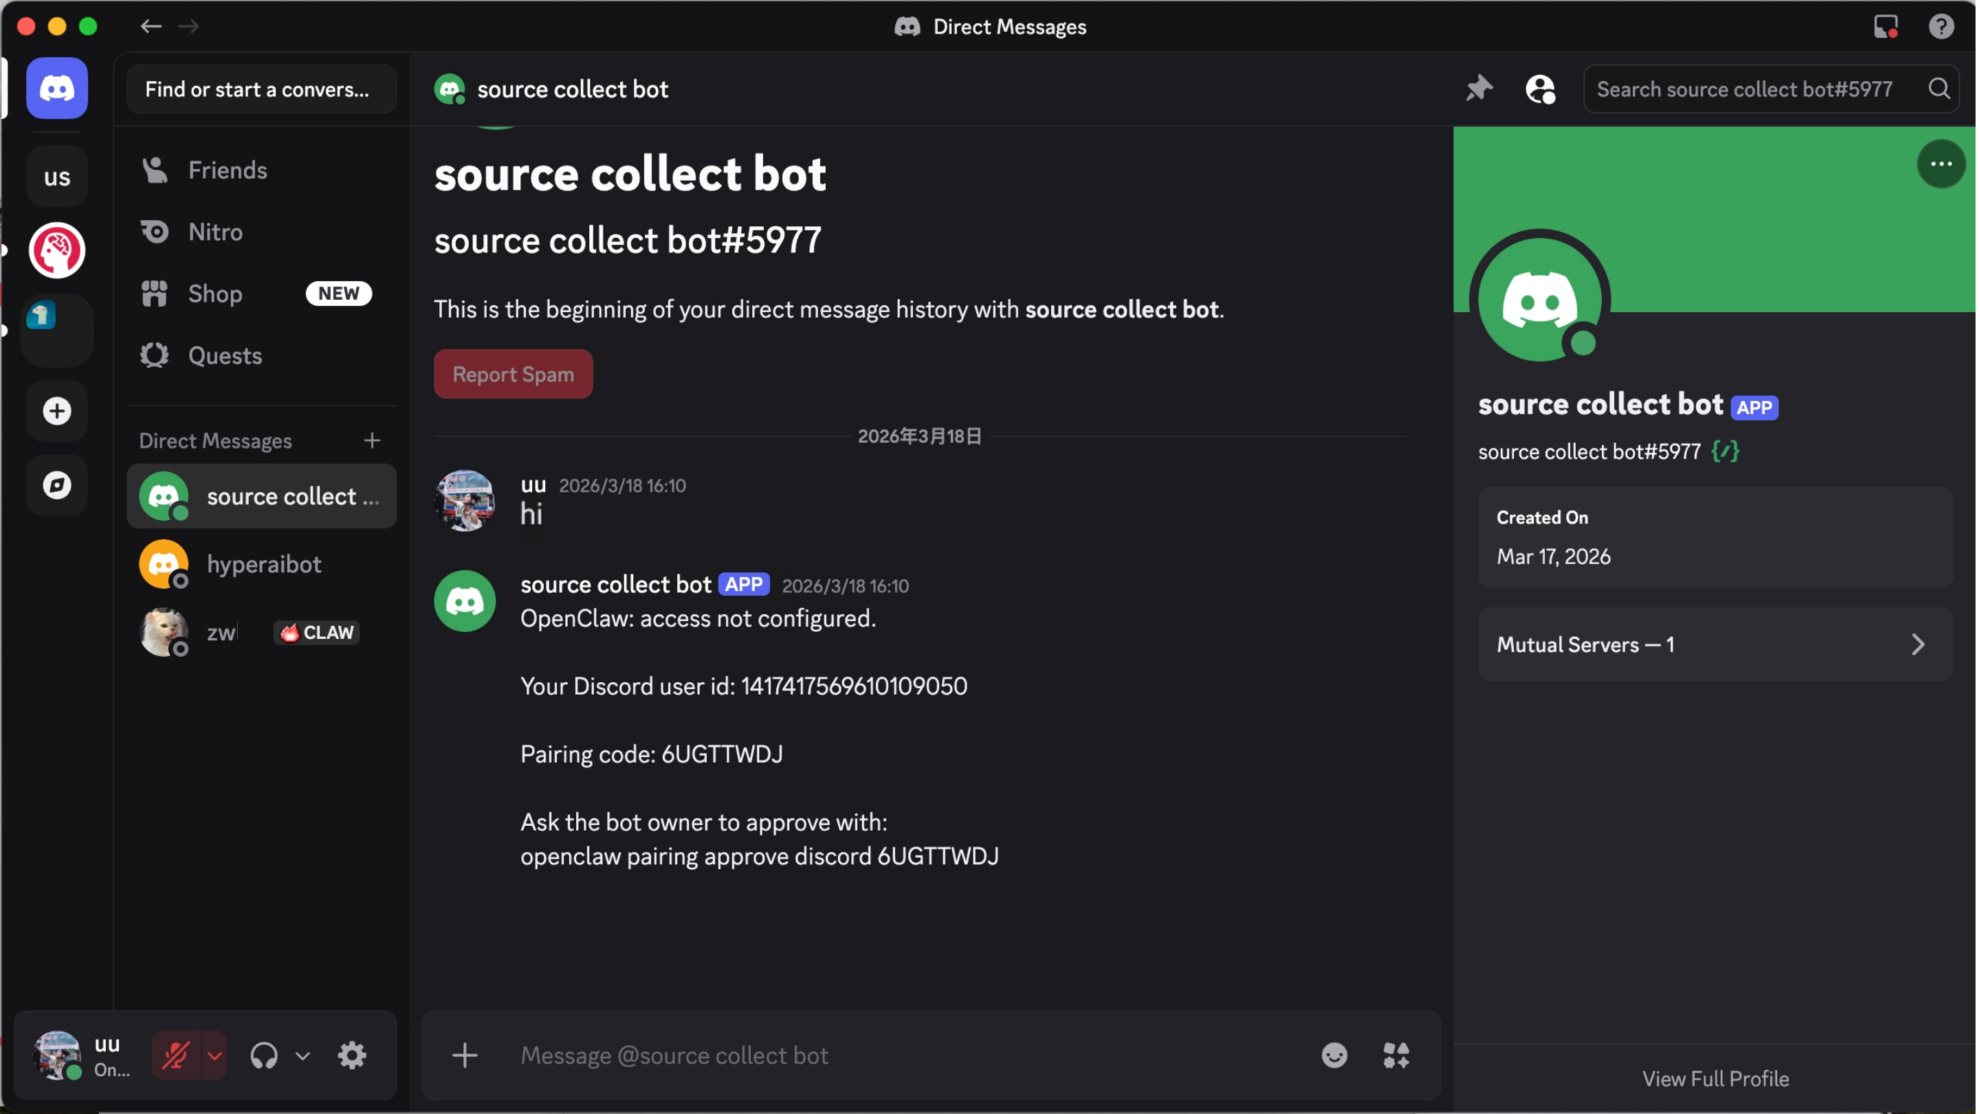
9. Next, return to the Discord client to receive the pairing code. Find the bot you just added in the private message list on the left and send it any message. The bot will automatically reply with a pairing code consisting of letters or numbers. Then return to the chat window where you sent the command to the Agent and send the received pairing code directly to the Agent: Approve this Discord pairing code: <Your Pairing Code>.
At this point, we have completed ID binding and authorization verification.You can now start a fully private AI conversation experience directly in your Discord private messages!