Command Palette
Search for a command to run...
vLLM Getting Started Tutorial: A Step-by-Step Guide for Beginners

Table of contents
- 1. Tutorial Introduction
- 2. Installing vLLM
- 3. Getting Started
- 4. Launching the vLLM Server
- 5. Sending Requests
1. Tutorial Introduction
vLLM (Virtual Large Language Model) is a framework designed for accelerating the reasoning of large language models. It has attracted widespread attention worldwide due to its excellent reasoning efficiency and resource optimization capabilities. In 2023, a research team from the University of California, Berkeley (UC Berkeley) proposed the groundbreaking attention algorithm PagedAttention, which can effectively manage attention keys and values. On this basis, the researchers built a high-throughput distributed LLM service engine vLLM, which achieved almost zero waste of KV cache memory and solved the memory management bottleneck problem in large language model reasoning. Compared with Hugging Face Transformers, its throughput has increased by 24 times, and this performance improvement does not require any changes to the model architecture. The relevant paper results are "Efficient Memory Management for Large Language Model Serving with PagedAttention".
In this tutorial, we will show you step by step how to configure and run vLLM, providing a complete getting started guide from installation to startup.
This tutorial will use Qwen3-0.6B For demonstration, models with other parameter quantities are also provided.
2. Install vLLM
This platform has been completed vllm==0.8.5 If you are operating on the platform, please skip this step. If you are deploying locally, please follow the steps below to install it.
Installing vLLM is very simple:
pip install vllmNote that vLLM is compiled with CUDA 12.4, so you need to make sure your machine is running that version of CUDA.
To check the CUDA version, run:
nvcc --versionIf your CUDA version is not 12.4, you can either install a version of vLLM that is compatible with your current CUDA version (see the installation instructions for more information), or install CUDA 12.4.
3. Start using
3.1 Model Preparation
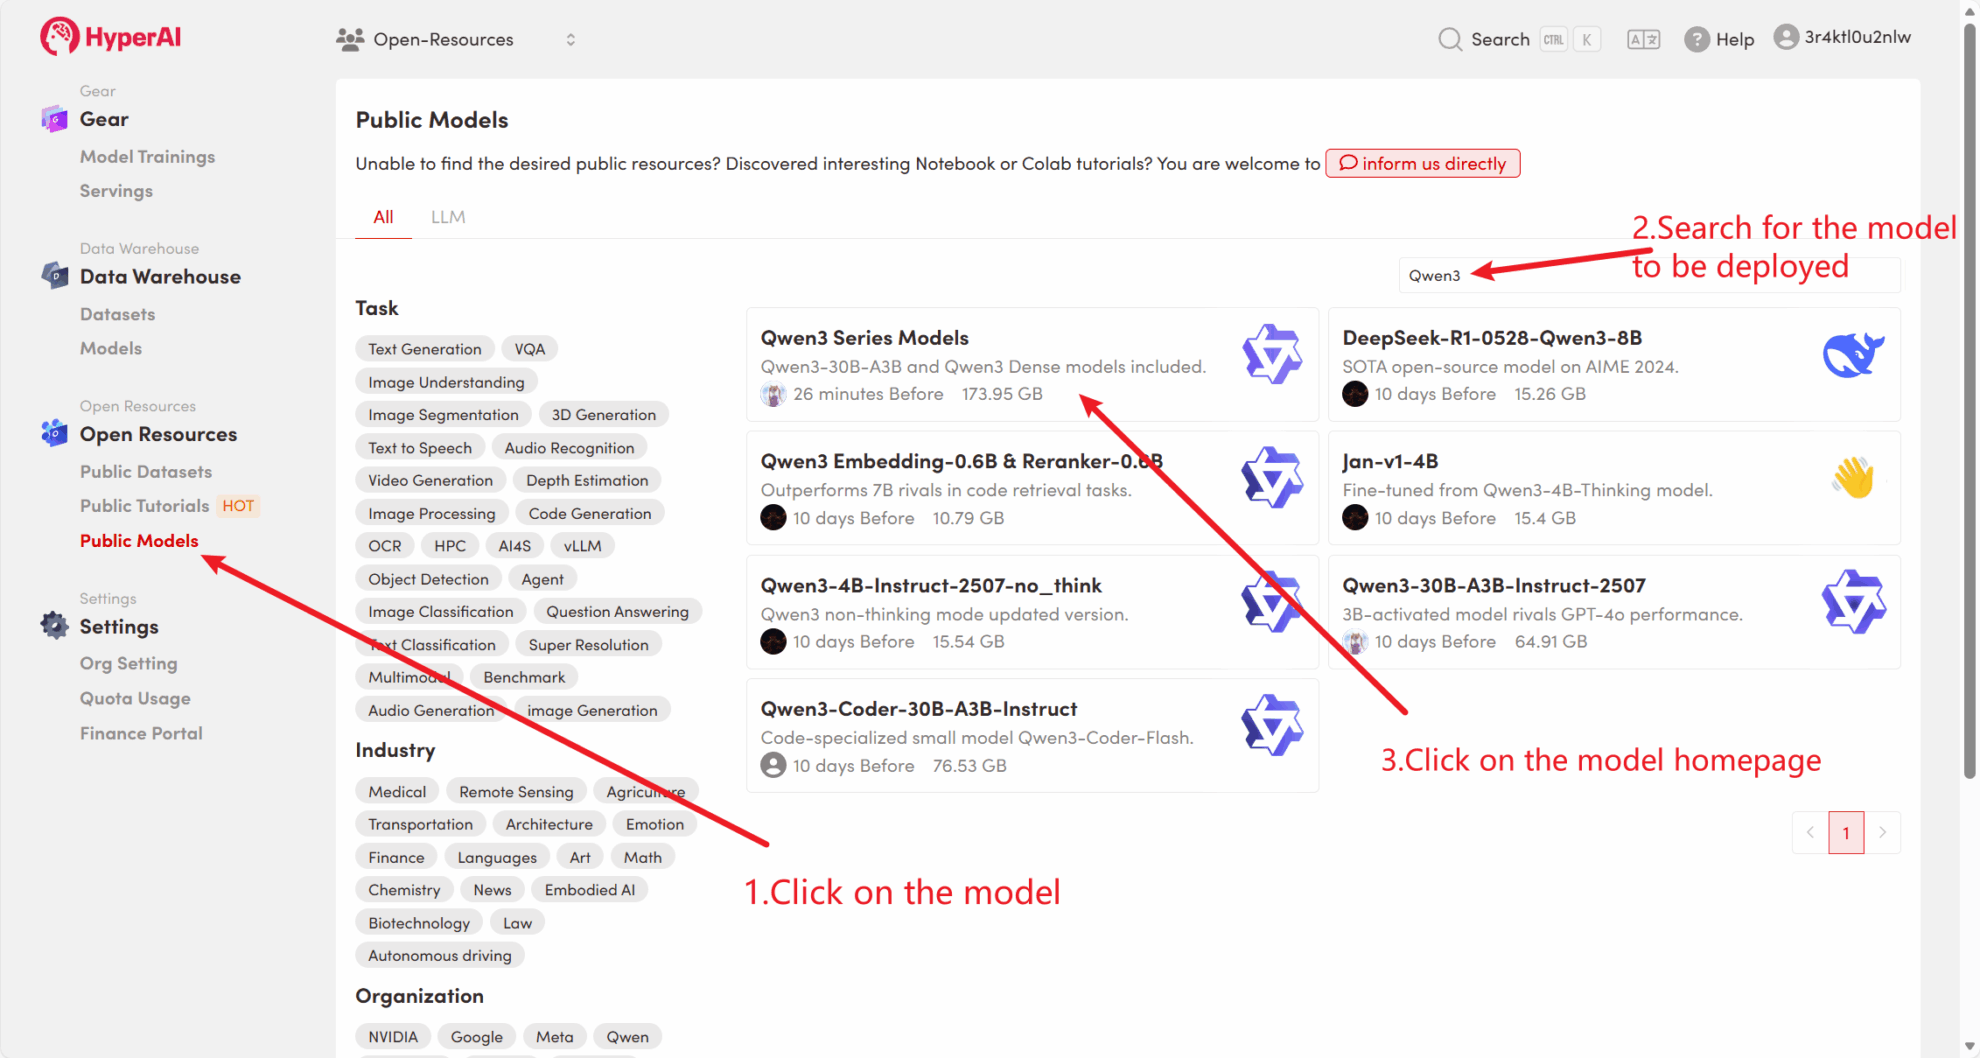
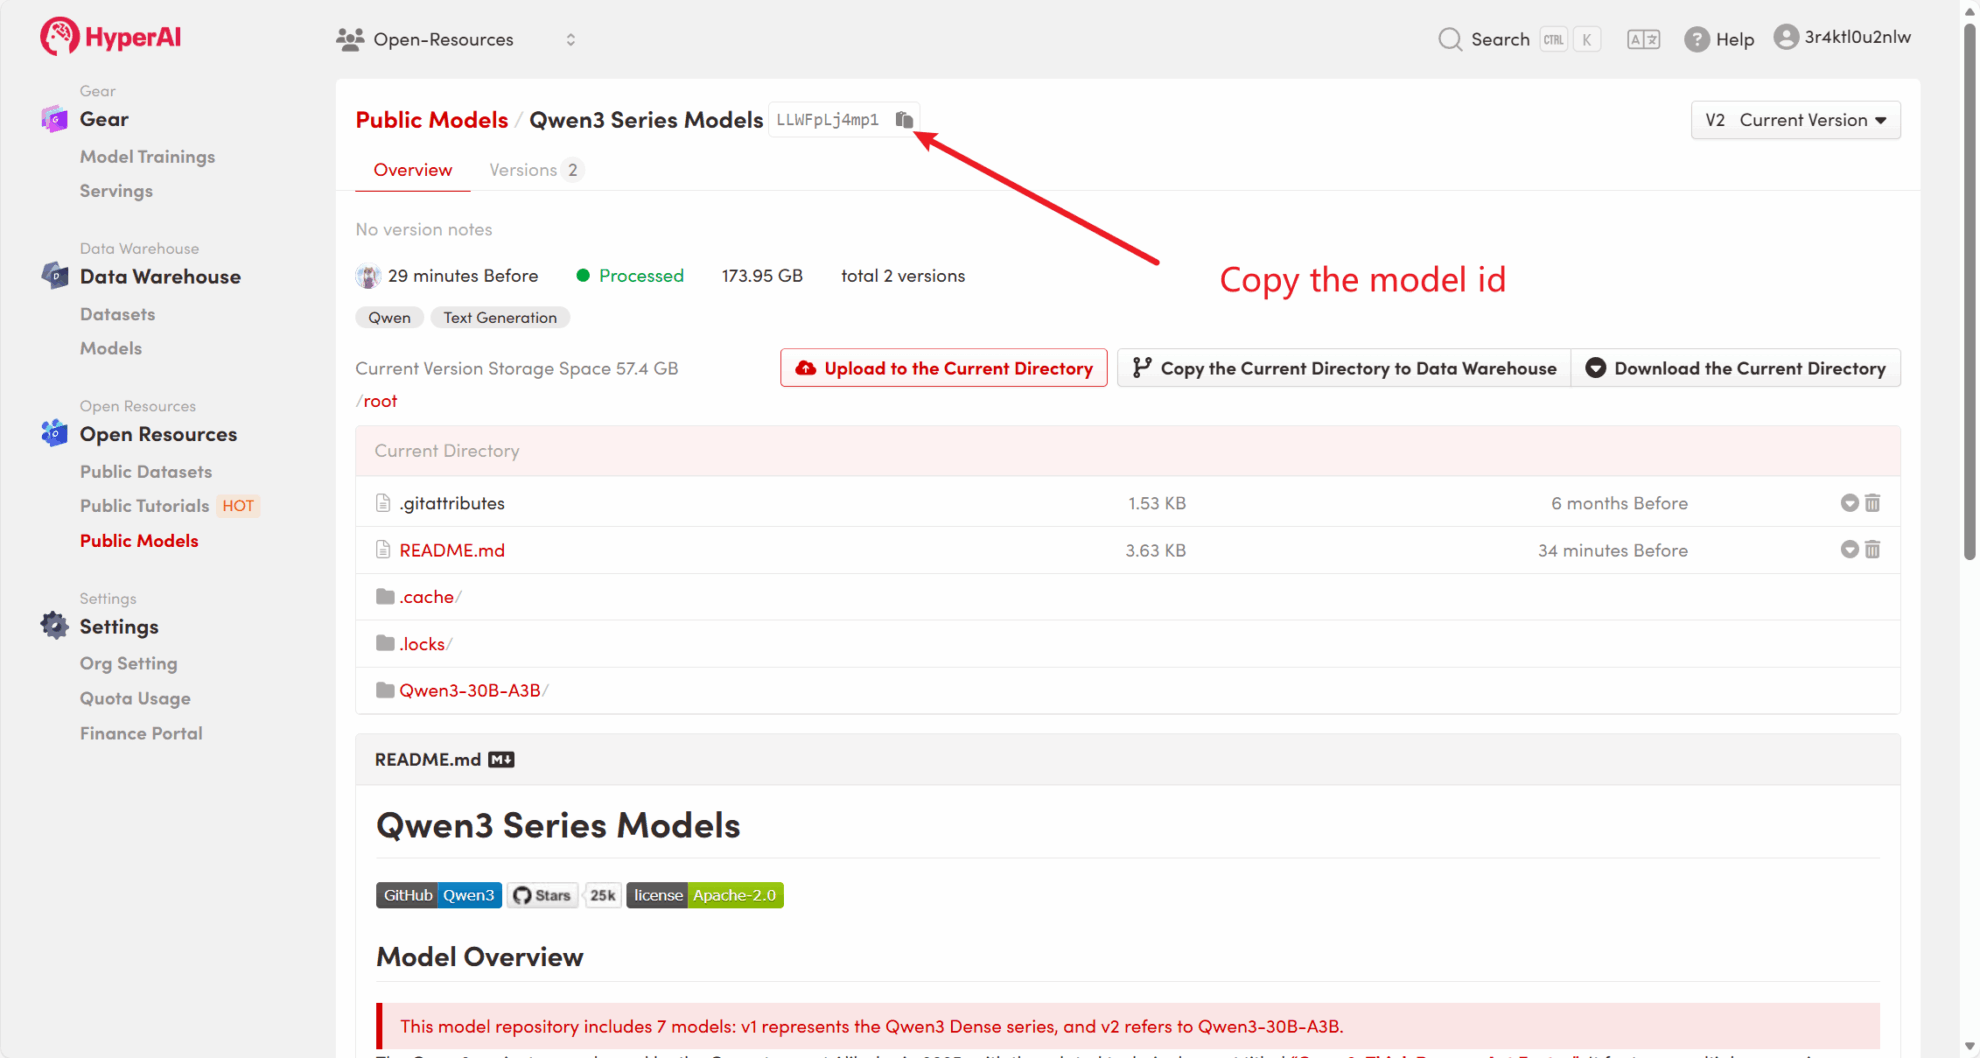
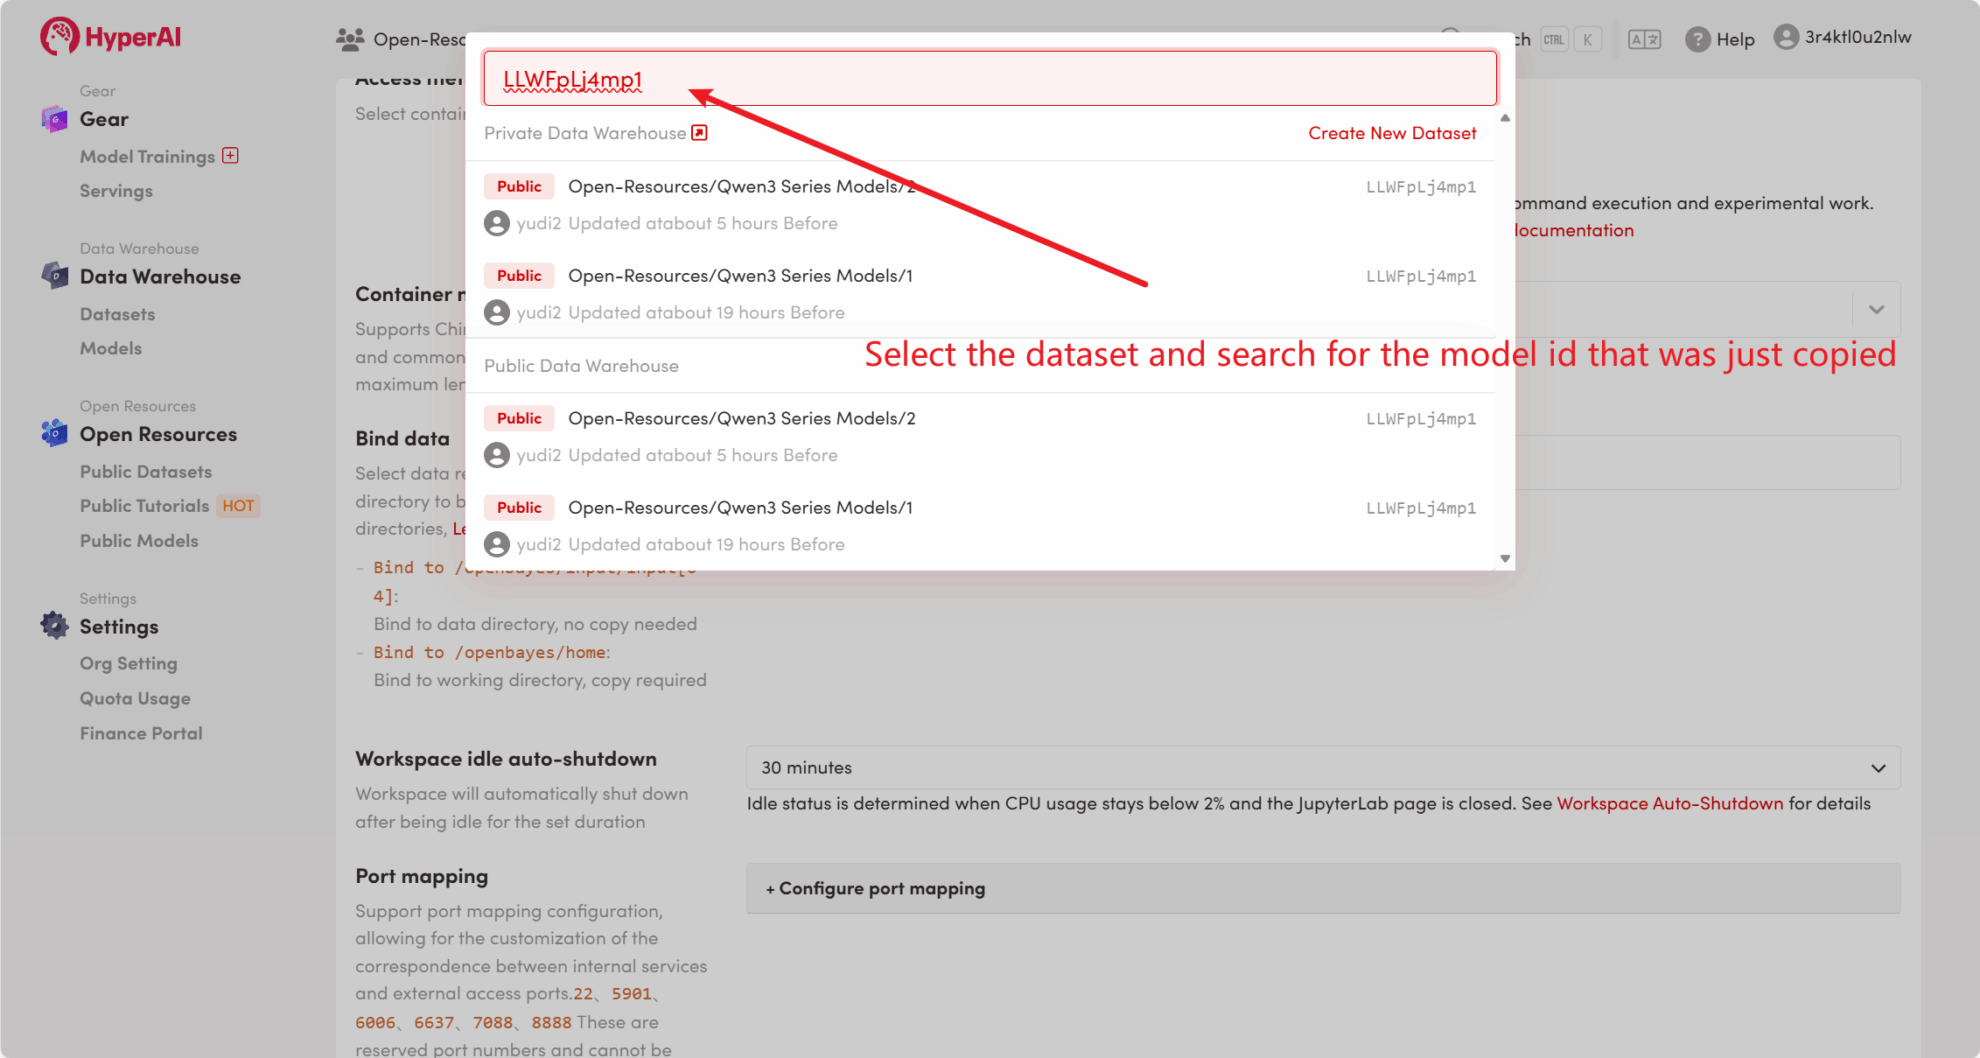
Method 1: Use the platform public model
First, we can check whether the public model of the platform already exists. If the model has been uploaded to the public resource library, you can use it directly. If it is not found, please refer to method 2 to download it.
For example, the platform has stored Qwen3 Series model. The following are the steps for binding the model (this tutorial has already bound this model).
Method 2: Download from HuggingFace or contact customer service for assistance in uploading to the platform.
Most mainstream models can be found on HuggingFace. For a list of models supported by vLLM, please refer to the official documentation: vllm-supported-models .
Please follow the steps below to download the model using huggingface-cli:
huggingface-cli download --resume-download Qwen/Qwen3-0.6B --local-dir ./input03.2 Offline Reasoning
As an open source project, vLLM can perform LLM reasoning through its Python API. The following is a simple example. Please save the code as offline_infer.py document:
from vllm import LLM, SamplingParams

# 输入几个问题
prompts = [
        "Hello, who are you??", "Where is the capital of France??",]

# 设置初始化采样参数
sampling_params = SamplingParams(temperature=0.8, top_p=0.95, max_tokens=100)

# 加载模型,确保路径正确
llm = LLM(model="/input1/Qwen3-0.6B/", trust_remote_code=True, max_model_len=4096)

# 展示输出结果
outputs = llm.generate(prompts, sampling_params)

# 打印输出结果
for output in outputs:
    prompt = output.prompt
    generated_text = output.outputs[0].text
    print(f"Prompt: {prompt!r}, Generated text: {generated_text!r}")
Then run the script:
python offline_infer.pyOnce the model is loaded, you will see the following output:

4. Start the vLLM server
To serve online using vLLM, you can launch a server compatible with the OpenAI API. Once launched successfully, you can use the deployed model just like using GPT.
4.1 Main parameter settings
The following are some common parameters when starting a vLLM server:
--model: HuggingFace model name or path to use (default:facebook/opt-125m).--hostand--port: Specify the server address and port.--dtype: The type of precision for model weights and activations. Possible values:auto,half,float16,bfloat16,float,float32.default value:auto.--tokenizer: HuggingFace tokenizer name or path to use. If not specified, the model name or path is used by default.--max-num-seqs: Maximum number of sequences per iteration.--max-model-len: The context length of the model. The default value is automatically obtained from the model configuration.--tensor-parallel-size,-tp: Number of parallel copies of tensors (for GPU). Default value:1.--distributed-executor-backend=ray: Specifies the backend of the distributed service. Possible values:ray,mp.default value:ray(When using more than one GPU, it is automatically set toray).
4.2 Start the command line
Create a server compatible with the OpenAI API interface. Run the following command to start the server:
python3 -m vllm.entrypoints.openai.api_server --model /input1/Qwen3-0.6B/ --host 0.0.0.0 --port 8080 --dtype auto --max-num-seqs 32 --max-model-len 4096 --tensor-parallel-size 1 --trust-remote-codeUpon successful startup, you will see output similar to the following:
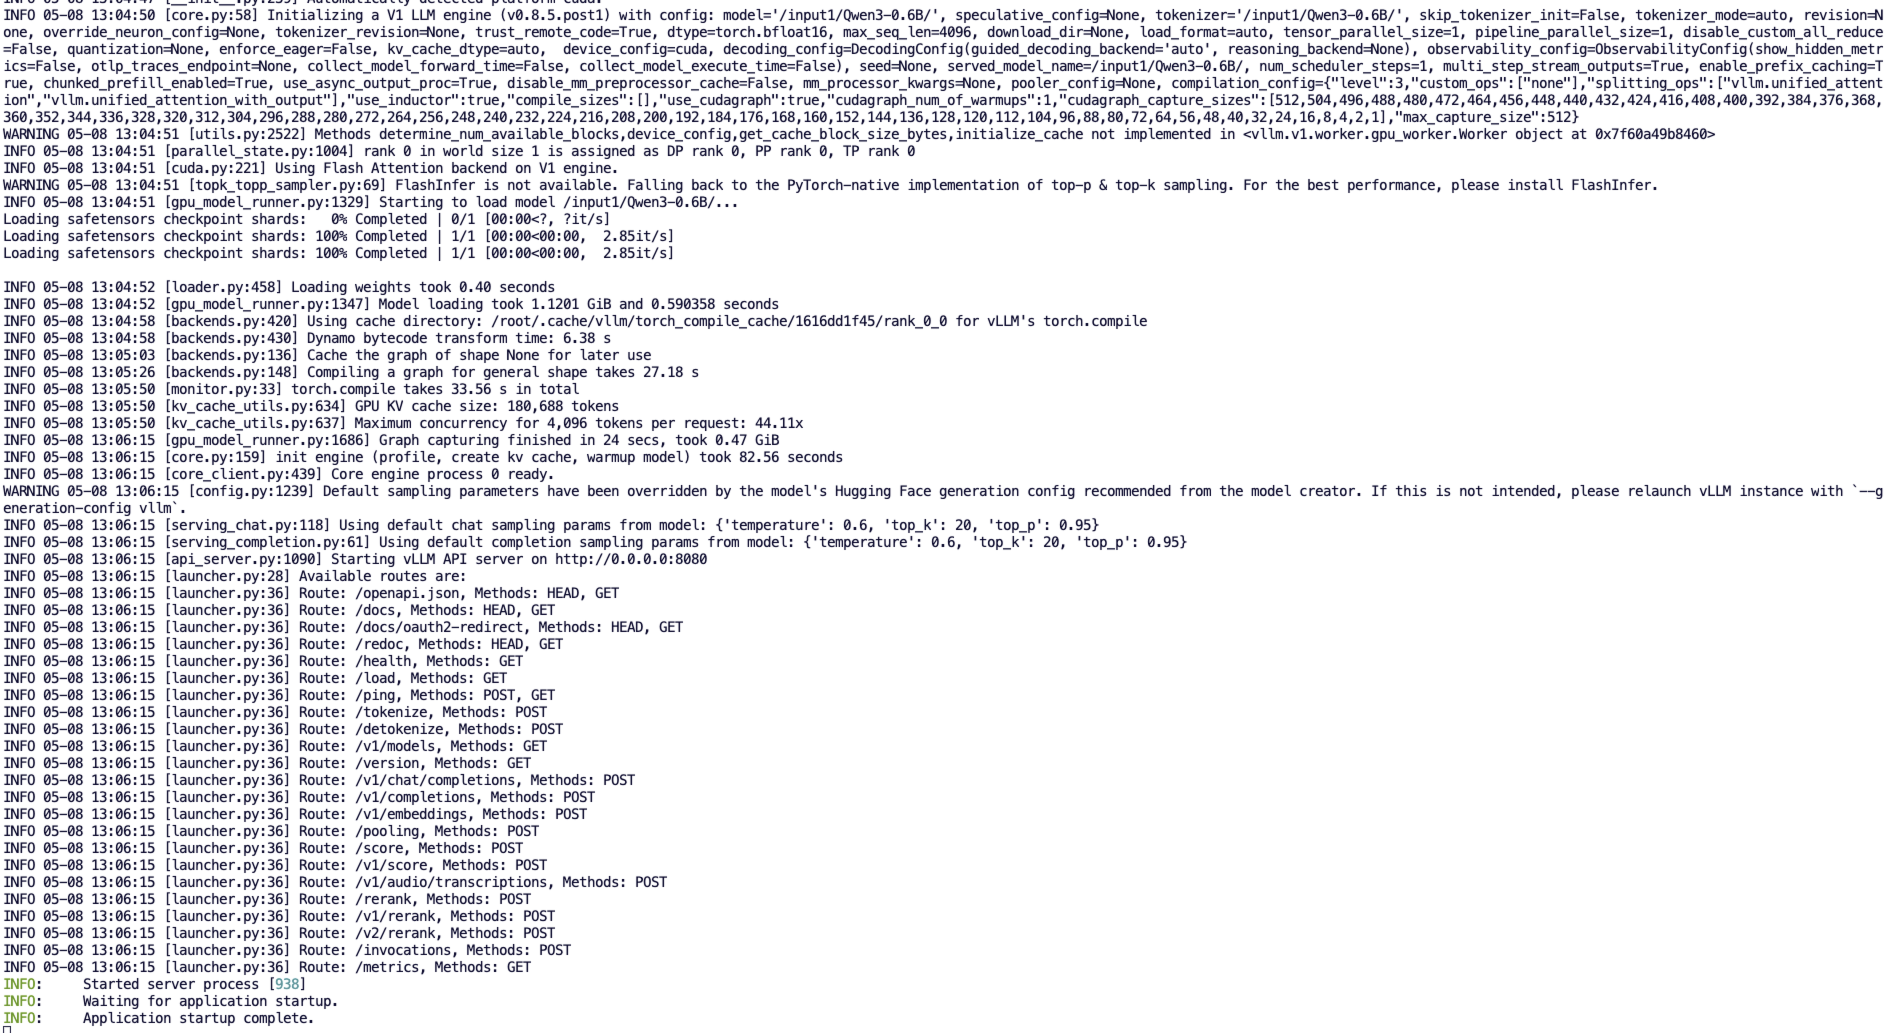
vLLM can now be deployed as a server implementing the OpenAI API protocol, by default it will be available in http://localhost:8080 Start the server. You can do this by --host and --port Parameter specifies a different address.
5. Make a request
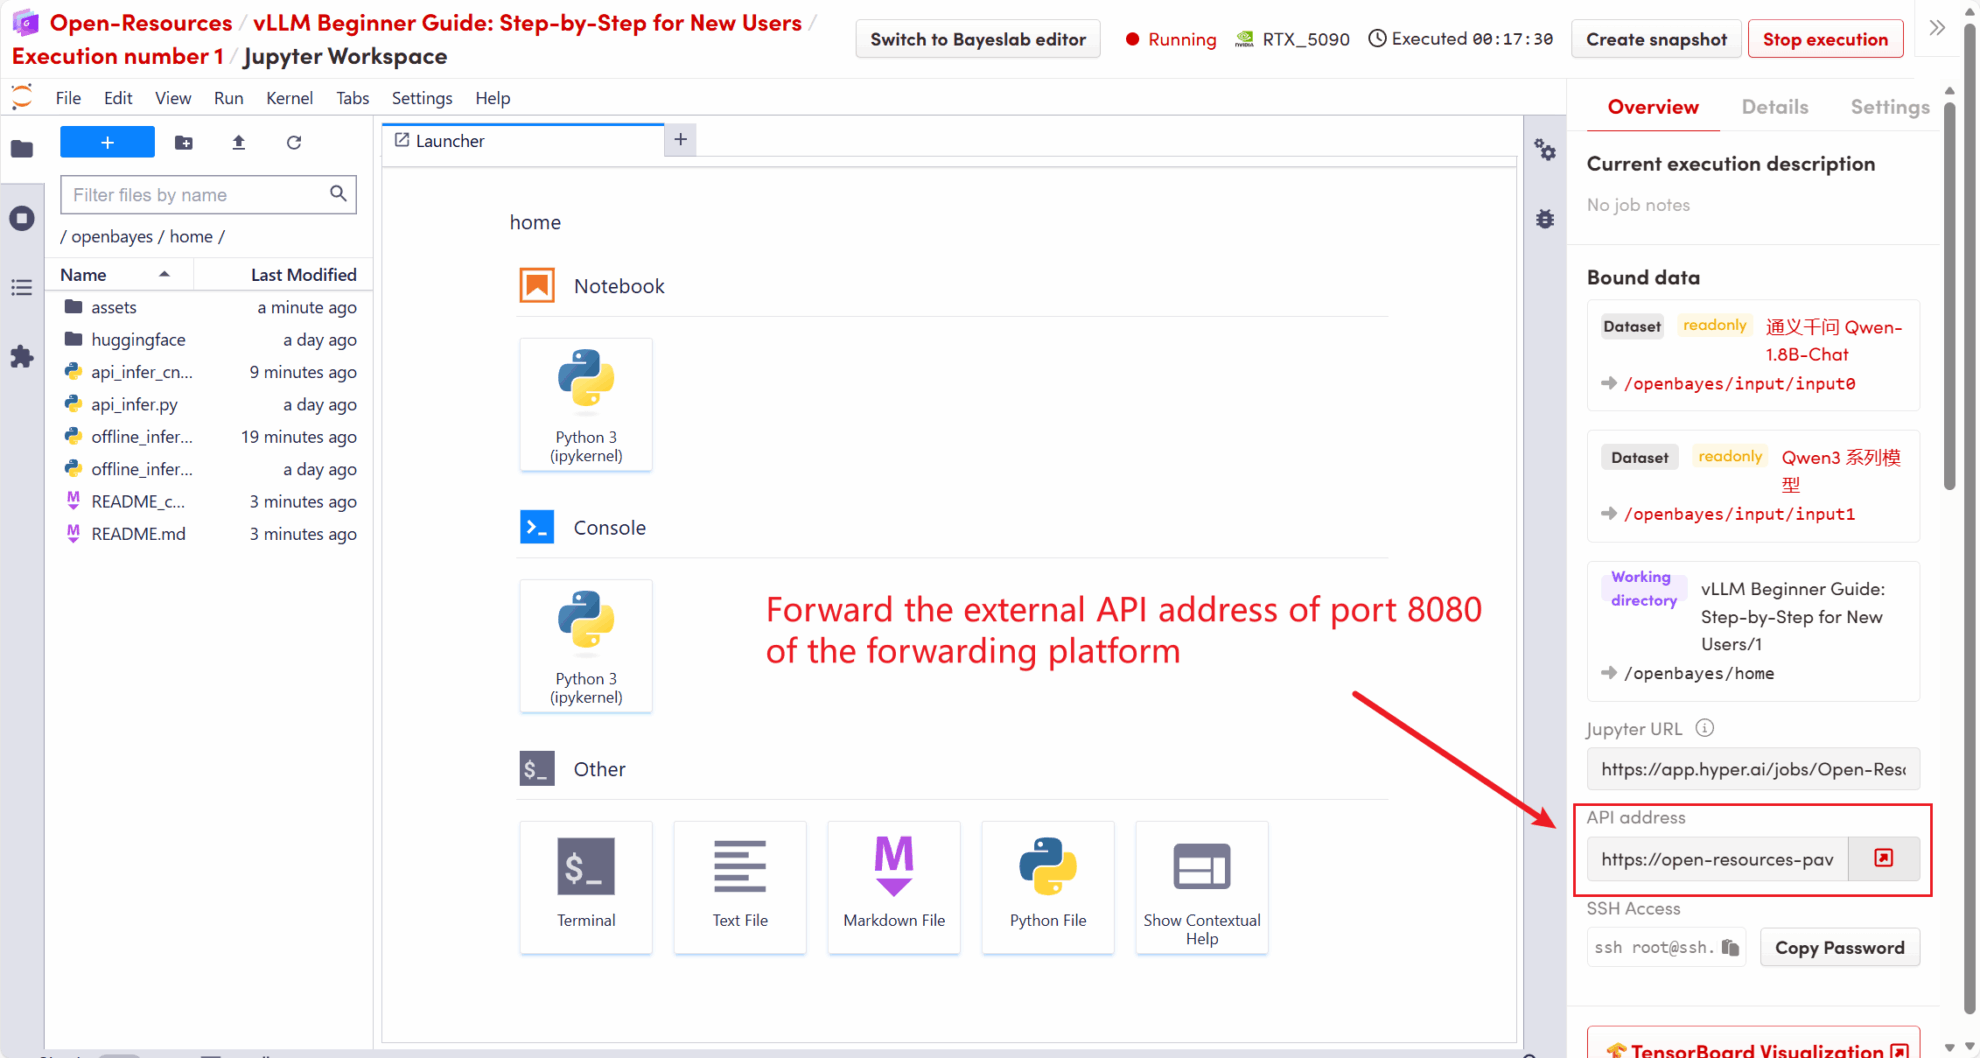
The API address started in this tutorial is http://localhost:8080, you can use the API by visiting this address. localhost Refers to the platform itself,8080 Is the port number that the API service listens on.
On the right side of the workspace, the API address will be forwarded to the local 8080 service, and requests can be made through the real host, as shown in the following figure:
5.1 Using the OpenAI Client
After starting the vLLM service in step 4, you can call the API through the OpenAI client. Here is a simple example:
# 注意:请先安装 openai
# pip install openai
from openai import OpenAI

# 设置 OpenAI API 密钥和 API 基础地址
openai_api_key = "EMPTY"  # 请替换为您的 API 密钥
openai_api_base = "http://localhost:8080/v1"  # 本地服务地址

client = OpenAI(api_key=openai_api_key, base_url=openai_api_base)

models = client.models.list()
model = models.data[0].id
prompt = "Describe the autumn in Beijing"
# Completion API 调用
completion

 = client.completions.create(model=model, prompt=prompt)
res = completion.choices[0].text.strip()
print(f"Prompt: {prompt}\nResponse: {res}")
Execute the command:
python api_infer.pyYou will see output similar to the following:

5.2 Using Curl command request
You can also send a request directly using the following command. When accessing on the platform, enter the following command:
curl http://localhost:8080/v1/completions \
  -H "Content-Type: application/json" \
  -d '{
    "model": "/input1/Qwen3-0.6B/",
    "prompt": "Describe the autumn in Beijing",    "max_tokens": 512
  }'
You will get a response like this:

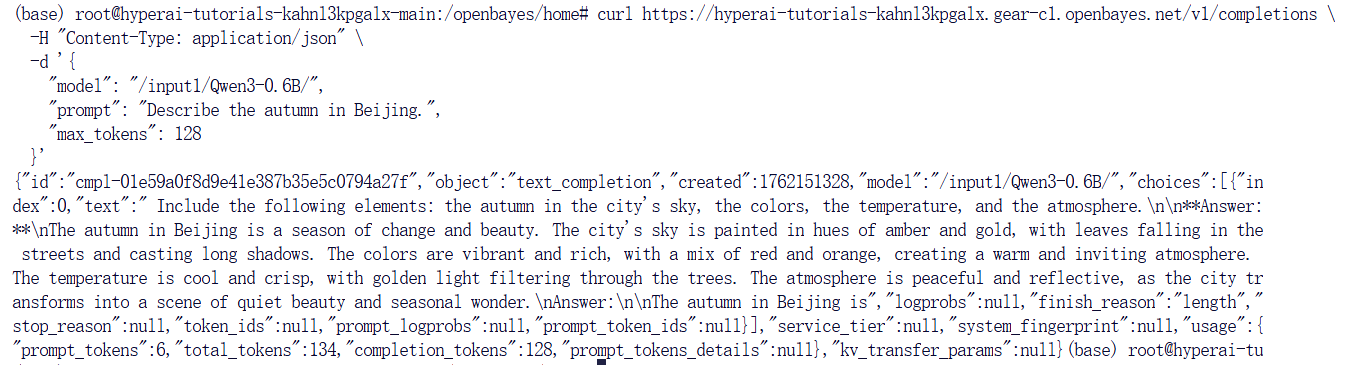
If you are using the OpenBayes platform, enter the following command:
curl https://hyperai-tutorials-8tozg9y9ref9.gear-c1.openbayes.net/v1/completions \
  -H "Content-Type: application/json" \
  -d '{
    "model": "/input1/Qwen3-0.6B/",
    "prompt": "Describe the autumn in Beijing",    "max_tokens": 128
  }'
The response result is as follows:
Build AI with AI
From idea to launch — accelerate your AI development with free AI co-coding, out-of-the-box environment and best price of GPUs.