Command Palette
Search for a command to run...
PyTorch3D Stereo Implicit Shape Rendering: Teach You to Build Scene 3D Structure
Contents
3D deep learning has always been a difficult point in the field of machine vision. In order to accurately and efficiently build a three-dimensional model of the scene and obtain relatively realistic rendering results, some major manufacturers in the industry have successively open-sourced their research and development results.
However, in the real world, objects mostly exist in the form of 3D structures.How to accurately improve the AI system's ability to perceive and understand complex real-world environments and correctly process 3D images,It is becoming an increasingly critical technical difficulty.

On January 23, 2020, Facebook AI released PyTorch3D v0.1.0. PyTorch3D is an optimized, efficient, and reusable component library in PyTorch. It has three outstanding features: high efficiency, modularity, and differentiability.Aims to simplify 3D deep learning in PyTorch.
PyTorch3D provides two major components: 3D operators and rendering.
In 3D operators,Fit Mesh can use 3D loss function,Deform the initial generic shape into the target shape and make the target shape smoother with the help of some rules.The Bundle Adjustment method in 3D operators, then provides cameras , transforms , so3 There are 3 APIs in total, which form a mapping of the camera's perspective based on the perspective of a given camera, thereby inferring the 3D structure of the scene.
Rendering includes texture mesh renderer (Render Textured Meshes), DensePose mesh renderer (Render DensePose Meshed), color point cloud renderer (Render Colored Pointclouds), etc.With the help of these renderers, the resulting 3D structure of the scene can be further optimized.
On February 6, 2020, PyTorch3D related code was open sourced on GitHub. After 5 versions of iteration, on February 9, 2021, PyTorch3D released its sixth public version v0.4.0.New features include implicit functions, stereo rendering, and NeRF reimplementation.Provides a faster and more flexible open source library for 3D deep learning research.

Implicit Shape Rendering
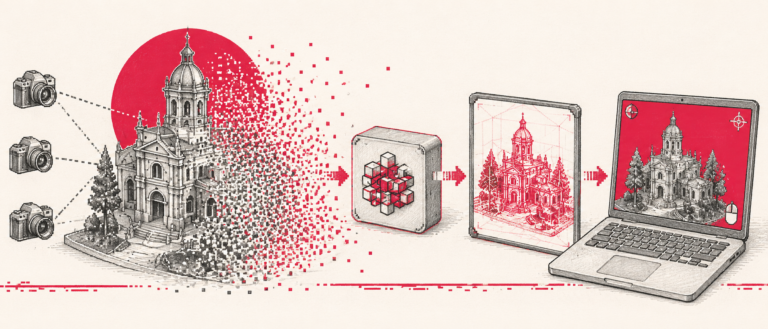
Implicit shape rendering is the process of generating realistic renderings of 3D scenes based on new perspectives of the input scene.The core idea is to use neural networks and differentiable rendering to reconstruct the implicit form of the 3D scene surface.This makes it possible to learn the geometry of 3D scenes using only 2D views.
There are several key components required to perform implicit shape rendering.Includes abstractions for volume data and differentiable implicit shape renderers.
To make it easier for industry practitioners to experiment with implicit shape rendering,PyTorch3D already provides users with a series of commonly used 3D operators and loss functions, as well as a modular and differentiable rendering API.While pointing out the core reusable components, it also provides proven, standardized implementation methods of these components.
In PyTorch3D v0.4.0, there are 5 new features that support implicit shape rendering:
1. Added data volume structure (Volumes data structure), supports batch processing of 3D volumes and conversion between coordinate frames;
2. Added multiple ray texture implementation methods: GridRaysampler, MonteCarloRaysampler, NDCGridRaysampler
3. Added multiple Raymarcher implementation methods: AbsorptionOnlyRaymarcher, EmissionAbsorptionRaymarcher
4. Added implicit renderer (ImplicitRenderer) and volume renderers (VolumeRenderer) API, which consists of Raysampler and Raymarcher
5. Added multiple utility functions, such as differentiable conversion from point cloud to volume.

To use these new components, a modular and well-documented NeRF reimplementation is available.
NeRF is a deep learning model.Developed by the Google Research team, it aims to represent scenes using Neural Radiance Fields for view synthesis.
NeRF is able to synthesize complex 3D scene graphs using only unstructured image collections.
The improved version of NeRF has been re-implemented with greatly improved performance. It runs faster than the official version while ensuring the quality of output images.

Tutorial (Fit Textured Volume)
Based on the PyTorch3D GitHub official tutorial Fit Textured Volume, we have translated and organized it to demonstrate how to use PyTorch3D.Using differentiable stereo rendering, we predict the stereo structure of a scene given a set of views of the scene.
Using Raymarching to build a 3D scene structure This tutorial will introduce:
- How to create a differentiable stereo renderer;
- How to create a volume model (including how to use the Volumes class);
- Use a differentiable stereo renderer to fit the stereo structure from the image;
- Visualize the predicted three-dimensional structure.
Note: Due to limited space, this article only shows part of the code. Please see the complete codeClick here.
0. Install and import modules
Make sure it is installed torch and torchvision .
If not installed pytorch3d , please install it.
1. Generate images of scenes and masks
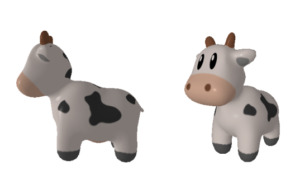
The following code will generate the training data. fit_textured_mesh.ipynb Tutorial, which renders an image of a cow from multiple angles, and returns the following:
A series of tensors of images generated by the cow mesh renderer and its silhouette; one-to-one correspondence for all camera shots.
Note: generate_cow_renders For the working principle of mesh rendering implemented in the function, please refer to:
fit_textured_mesh.ipynb
target_cameras, target_images, target_silhouettes = generate_cow_renders(num_views=40)
print(f'Generated {len(target_images)} images/silhouettes/cameras.')
2. Initialize the volume renderer
Initializing the volume renderer sends out a ray from each pixel of the target image and samples a set of evenly spaced points along the ray. The density and color values corresponding to each ray point can be obtained by querying the corresponding position in the volume model of the scene.
The renderer consists of a raymarcher and a raysampler constitute.
raysampler Responsible for emitting rays from image pixels and sampling points along the rays. NDCGridRaysampler , which conforms to the standard PyTorch3D coordinate grid specification.
raymarcher Get the density and color of the ray samples and render all rays into the color and opacity value of the pixel at the source of the ray. EmissionAbsorptionRaymarcher , which implements the standard Emission-Absorption Raymarching algorithm.
# render_size 表示渲染图像各个边的像素大小,将其设置为与目标图像尺寸一致
# 也就是说将其渲染成与基准图像一样的尺寸
render_size = target_images.shape[1]

# 渲染场景以(0,0,0)为中心,被限定在一个边长约等于 3.0 (国际单位) 的边框内。
volume_extent_world = 3.0

# 1) 实例化 raysampler
# 此处 NDCGridRaysampler 会生成一矩形图像网格的射线,其坐标遵循 pytorch3d 坐标规定
# 由于此处设定的体积是 128^3,因此取样 n_pts_per_ray=150
# 大致相当于每个体素都有一个射线点
# 进一步设置 min_depth=0.1,因为相机平面内的所有表面都超过了 0.1 单位
raysampler = NDCGridRaysampler(
    image_width=render_size,
    image_height=render_size,
    n_pts_per_ray=150,
    min_depth=0.1,
    max_depth=volume_extent_world,
)


# 2) 实例化 raymarcher.
# 此处用的是标准 EmissionAbsorptionRaymarcher
# 它会沿着每条射线前进
# 将每条射线都渲染成一个单一的 3D 颜色向量和一个不透明度标量
raymarcher = EmissionAbsorptionRaymarcher()

# 最后,用 raysampler 和 raymarcher 实例化体积渲染器
renderer = VolumeRenderer(
    raysampler=raysampler, raymarcher=raymarcher,
)
3. Initialize the volume model
Next, instantiate the volumetric model of the scene. This causes the 3D space to be quantized into volumetric pixels, where each voxel is represented by a 3D vector of the voxel's RGB color and a density scalar describing the opacity of the voxel (in the range [0-1], with higher numbers being more opaque).
In order to ensure that the density and color values are in the range [0-1], we will represent the volume color and density in logarithmic space. forward Function, log-space The value will be passed sigmoid Function passing, so that log-space The value is in the correct range.
also, VolumeModel Also contains the renderer object. This object remains unchanged throughout the optimization process.
This section of the code also defines huber The loss function calculates the difference between the rendered color and the mask.
4. Volume Fitting
In this step, we use differentiable rendering to perform volume fitting.
To fit the volume, we start from target_camera Rendering is performed from the perspective of target_images and target_silhouettes for comparison.
This comparison is evaluated by target_images/rendered_images and target_silhouettes/rendered_silhouettes This is done by the average Huber (smooth-L1) error between .
5. Visualize the optimized scene volume
Finally, the optimized volume is visualized by rotating the scene volume on its y-axis and rendering it from multiple viewpoints.
def generate_rotating_volume(volume_model, n_frames = 50):
    logRs = torch.zeros(n_frames, 3, device=device)
    logRs[:, 1] = torch.linspace(0.0, 2.0 * 3.14, n_frames, device=device)
    Rs = so3_exponential_map(logRs)
    Ts = torch.zeros(n_frames, 3, device=device)
    Ts[:, 2] = 2.7
    frames = []
    print('Generating rotating volume ...')
    for R, T in zip(tqdm(Rs), Ts):
        camera = FoVPerspectiveCameras(
            R=R[None],
            T=T[None],
            znear = target_cameras.znear[0],
            zfar = target_cameras.zfar[0],
            aspect_ratio = target_cameras.aspect_ratio[0],
            fov = target_cameras.fov[0],
            device=device,
        )
        frames.append(volume_model(camera)[..., :3].clamp(0.0, 1.0))
    return torch.cat(frames)

with torch.no_grad():
    rotating_volume_frames = generate_rotating_volume(volume_model, n_frames=7*4)

image_grid(rotating_volume_frames.clamp(0., 1.).cpu().numpy(), rows=4, cols=7, rgb=True, fill=True)
plt.show()
6. Conclusion
This tutorial demonstrates how to optimize the 3D volume construction of a scene so that the volume rendering for known viewpoints matches the observed image for each viewpoint.
The rendering in the tutorial was done using NDCGridRaysampler and EmissionAbsorptionRaymarcher The constructed PyTorch3D stereo renderer is completed.

View the full tutorial pleaseClick here.